
Hardware
GIGABYTE Radeon RX 480 G1 Gaming 8GB Graphics Card Review
Introduction
There is no doubt that the launch of the RX 480 had been clouded in controversy. However, since then there have been a number of custom coolers as well as custom PCBs, that, with new driver support, have fixed the issues. Among those custom cards sits the Gigabyte G1 Gaming Rx 480. Sporting the Windforce 2X cooler and up to 8gb of GDDR5, this card is designed to crush 1080p gaming. But can this sub $300 card, based on AMDs new Polaris architecture handle resolutions beyond 1080p and compete with the higher end cards the market has to offer? We’d like to thank the good people at Gigabyte for providing us with this card to review. Now, let’s see how this card holds up to the competition.
About Gigabyte
Gigabyte Technology is a well-known and respected international manufacturer and distributor of some of the best computer hardware money can buy. Gigabyte was established in 1986 by Pei-Cheng Yeh. To date, Gigabyte holds more than 13, 500 awards and has broken a number of World Overclocking records with their SOC Force line of motherboards. On average, they sell over 17 million motherboards alone each year. They design graphics cards and motherboards for both AMD and Intel, as well as much more. They also design and distribute desktop computers, tablet computers, Ultrabook’s, server motherboards, server racks, networking equipment, mice, keyboards, cooling components, power supplies, computer cases and much more.
The Polaris Architecture
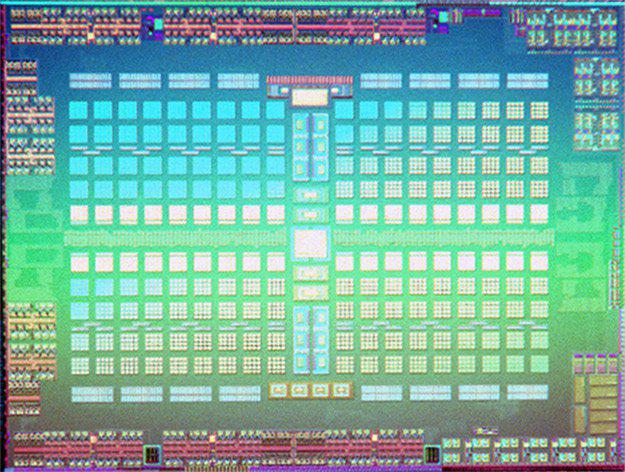
A die shot of the GPU in the RX 480.
AMDs Polaris is based on their 4th-Gen GCN, or Graphics Core Next, architecture. Overall AMD is is claiming that with the 4th-Ggn GCN architecture in the RX 480 you’ll see a 15% improvement in shader efficiency over the R9 290 using GCN 1.1. Polaris is based on the latest 14 nm FinFET manufacturing process. This is by far, AMDs best version of the GCN architecture to date. Its excellent asynchronous compute performance and new geometry capabilities enable unique support for both DirectX® 12 and the Vulkan™ API.
Features & Specifications
| Product Specifications | |
|---|---|
| Graphics Processing | Radeon RX480 |
| Core Clock | 1290 MHz |
| Process Technology | 14 nm |
| Memory Clock | 8,000 MHz |
| Memory Size | 8 GB |
| Memory Type | GDDR5 |
| Memory Bus | 256 bit |
| Card Bus | PCI-E 3.0 x 16 |
| Output | Dual-link DVI-D x 1, HDMI x 1, Displayport x 3 |
| Digital max resolution | 7680 x 4320 |
| Multi-view | 5 |
| Card size | H=40 mm L=232 mm W=116 mm |
| PCB Form | ATX |
| Recommended PSU | 500W |
| Power Connectors | 8 pin*1 |
| Supported APIs | DirectX 12, OpenGL 4.5 |
Packaging & Unboxing
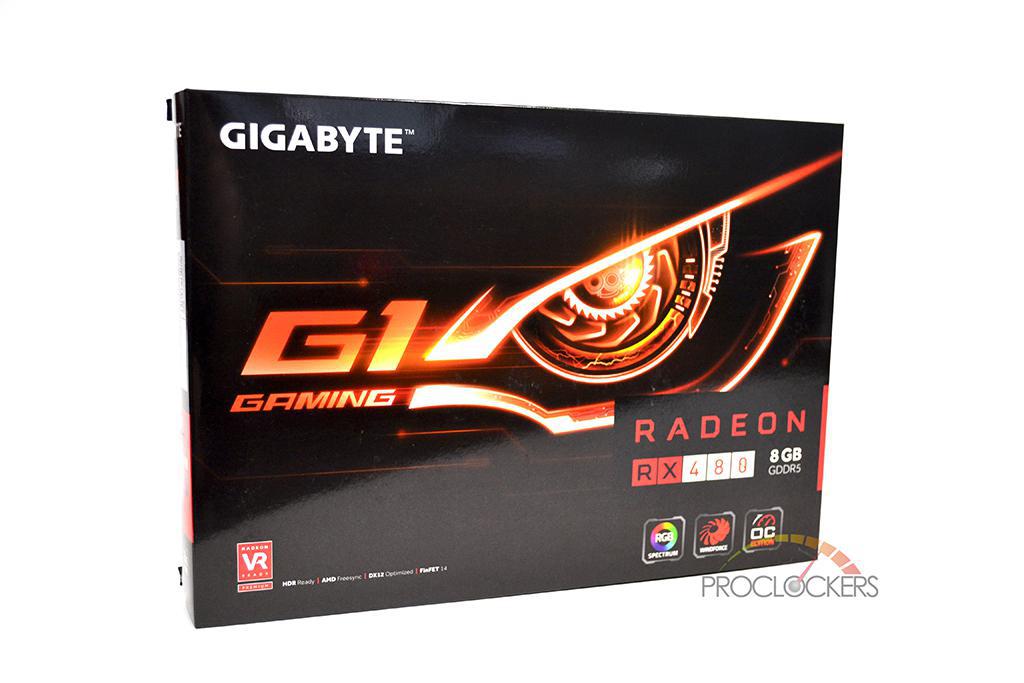
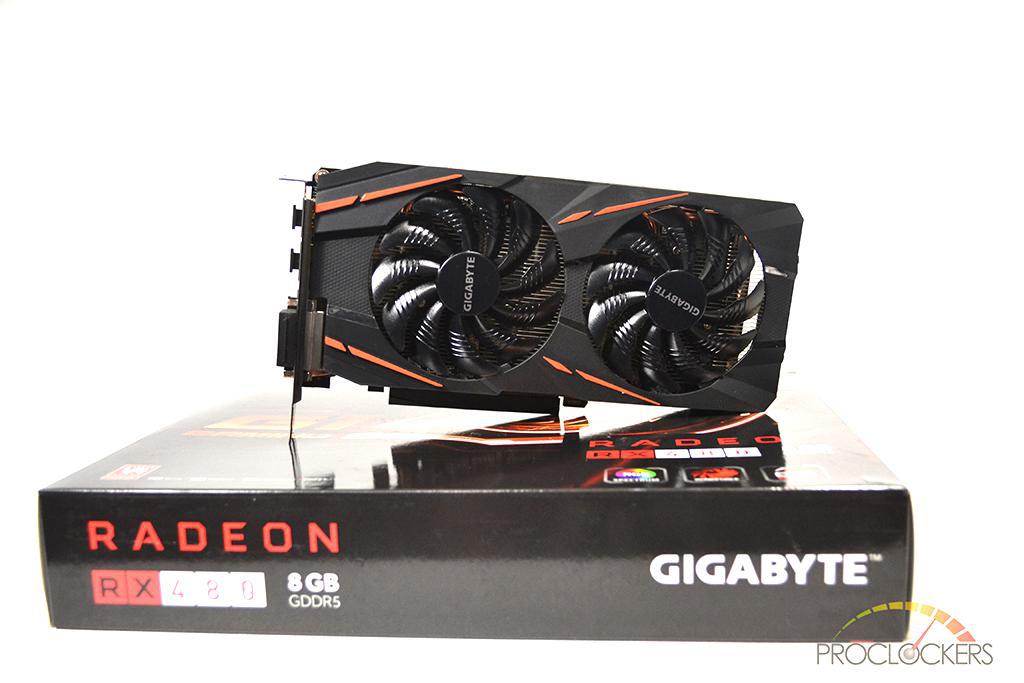
The front view of the G1 Gaming RX 480 box.
The G1 Gaming RX 480 came in a box a bit smaller than I had expected. On the front, in the top left hand corner is the Gigabyte logo. Directly under that is the G1 Gaming logo with the very recognizable Gigabyte eye. In my personal opinion, one of the best logos in the industry. On the bottom right corner of the box is the Radeon logo and the RX 480 branding. Best to the product branding is where they label amount of Vram, in this case 8gb is printed on the package. Below the product branding, they list some of the main features of the Windforce 2X cooler this card is sporting such as The RGB lighting, the Windforce cooler and the fact this is the “OC” edition.
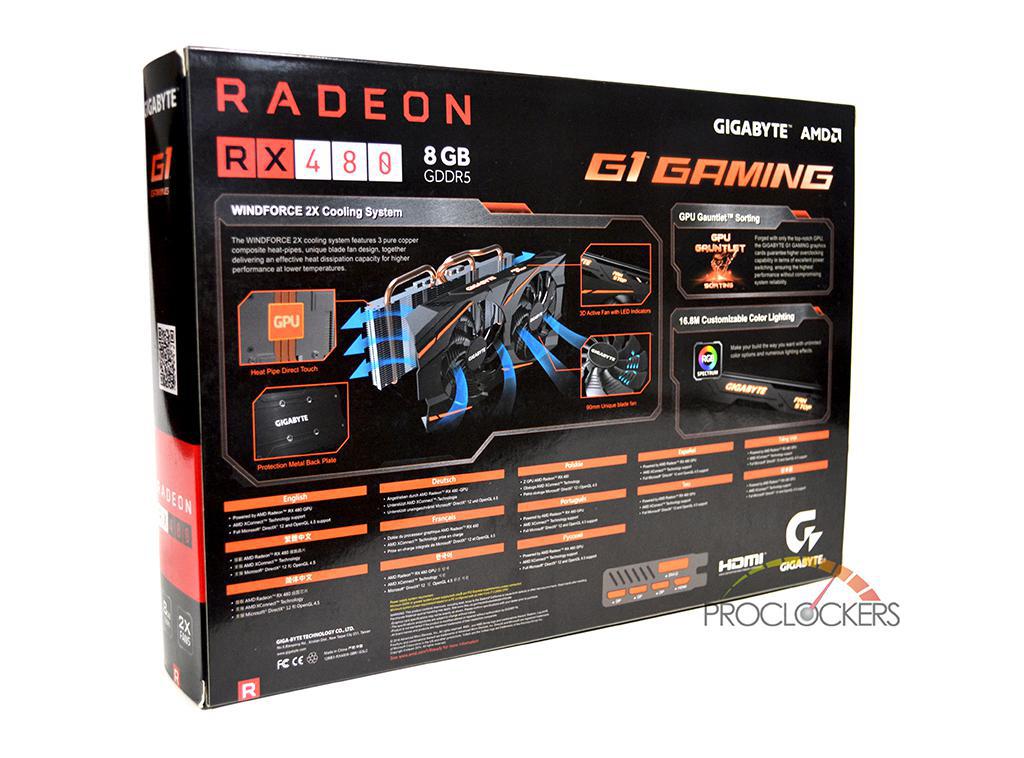
The rear of the box has a diagram of how the Windforce 2X cooler works as well as information on the RGB lighting on the cooler and the GPU Gauntlet that every card must pass.
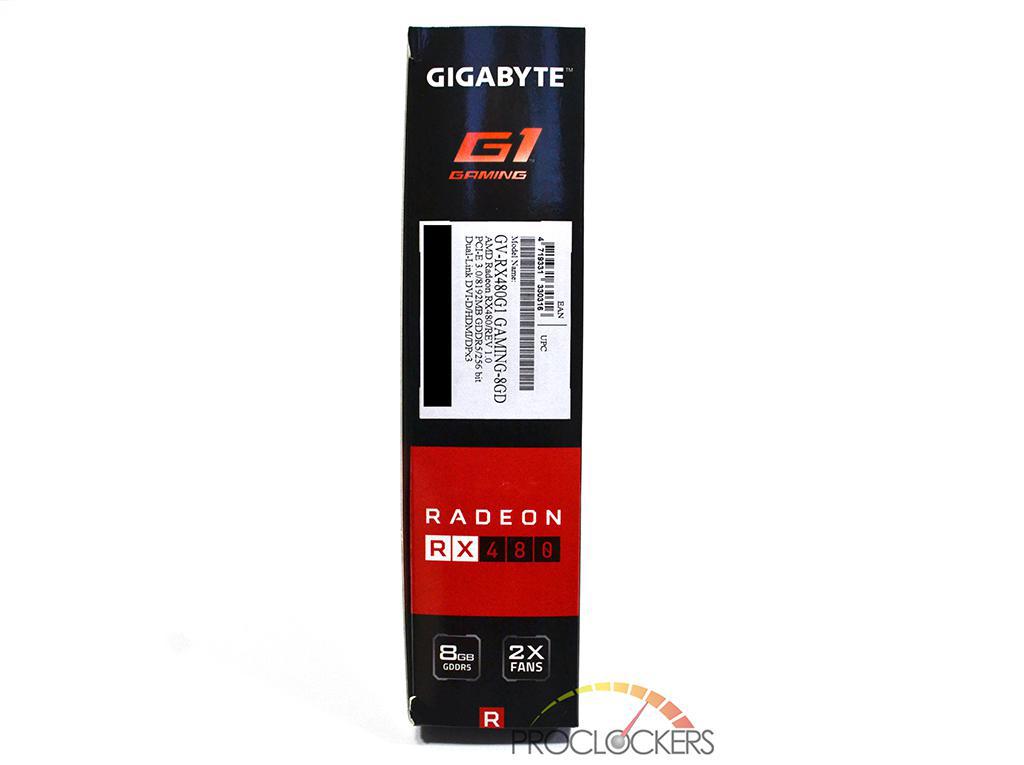
The left side of the box has the Model number, serial number and UPC code. There is also the G1 Gaming logo, Radeon logo and RX 480 product branding.
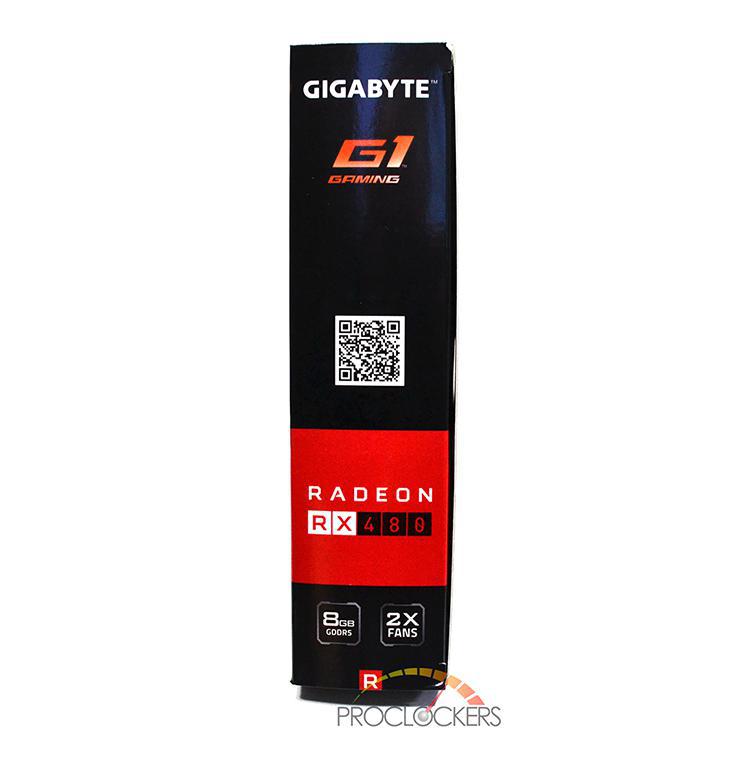
The right side of the box has the also the G1 Gaming logo, Radeon logo and RX 480 product branding. There is also a QR code you can scan to get to the product page.
The rear of the box has a number of logos along the top of the box. These include the G1 Gaming, AMD, Radeon, and Gigabyte logo, as well as the RX 480 8gb product branding. Below that is a blown out view of the card and the Windforce cooler with the key features labeled. Directly to the right of the picture is a brief explanation of the GPU Gauntlet Sorting every Gigabyte graphics card goes through. There is also mention of the RGB spectrum in the Windforce cooler. Below all that there are a few bits of information about the card in a number of languages. One the very bottom, there is a diagram of the IO of the card as well.
The top of the box has the G1 Gaming logo, Radeon logo and RX 480 product branding.

The bottom of the box is the same as the top.
Both the top and the bottom flaps of the box are the same. Each depicts the G1 Gaming logo and the RX 480 product branding. The left side of the packaging is more of the same, with a QR Code you can scan that brings you to the product page for the G1 Gaming RX 480. The right side of the box is the same as the left. However, in place of the QR code is the model number, serial number and UPC code. Once opened, you find another, plain black box. The only writing on this plain black, clam shell box, is the G1 Gaming logo across the front. The card is wrapped in an anti-static bag and sits encased in soft foam.
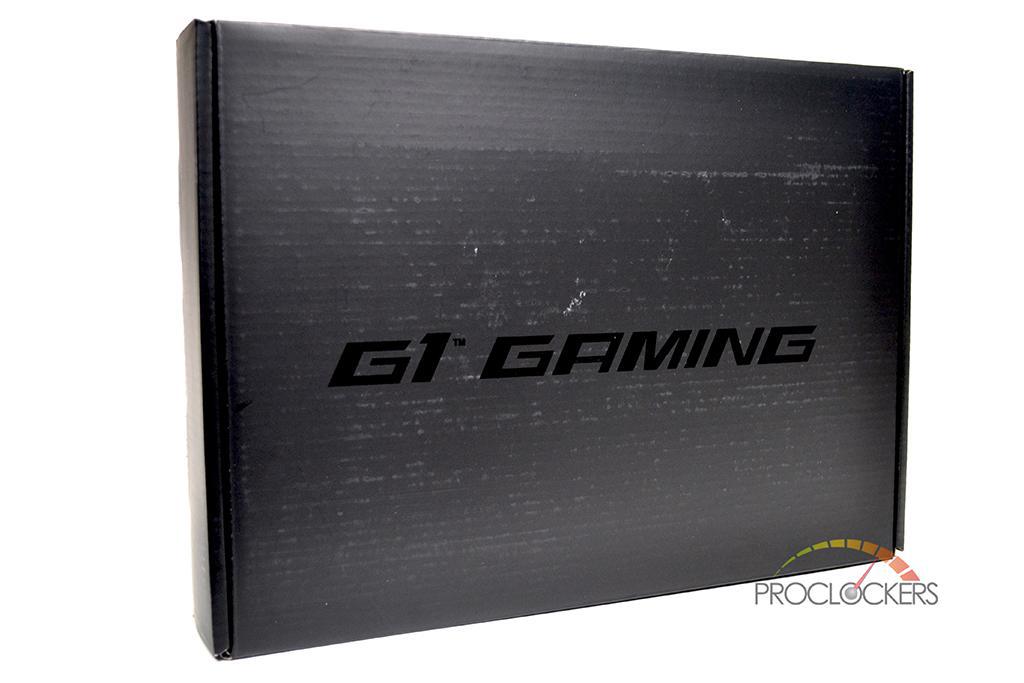
The inner box that the RX 480 is packed in.

The G1 Gaming RX 480 comes wrapped in an anti-static bag in packed in soft foam.
The G1 Gaming RX 480 unpacked and ready to install.
A Closer Look

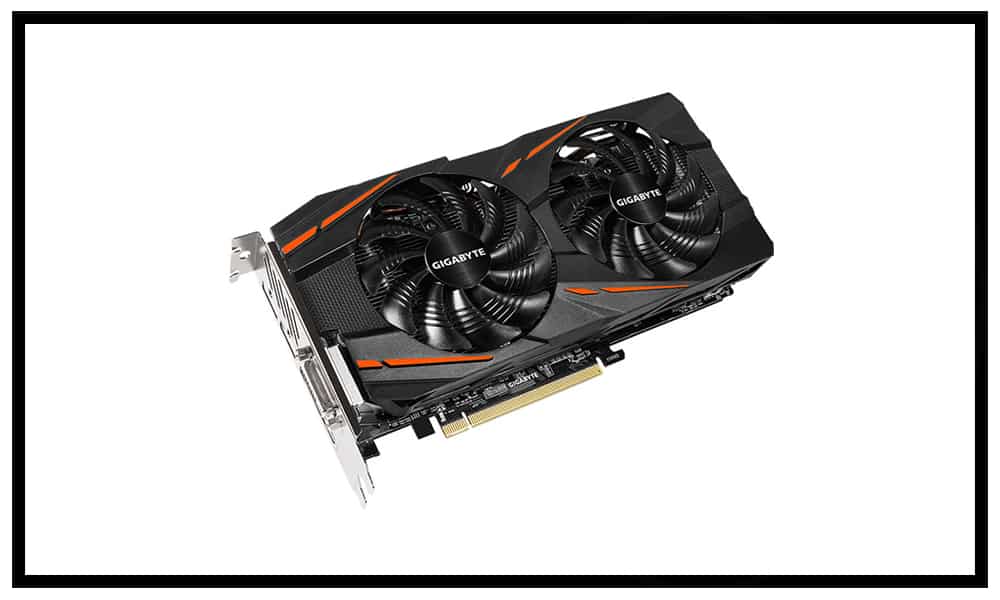
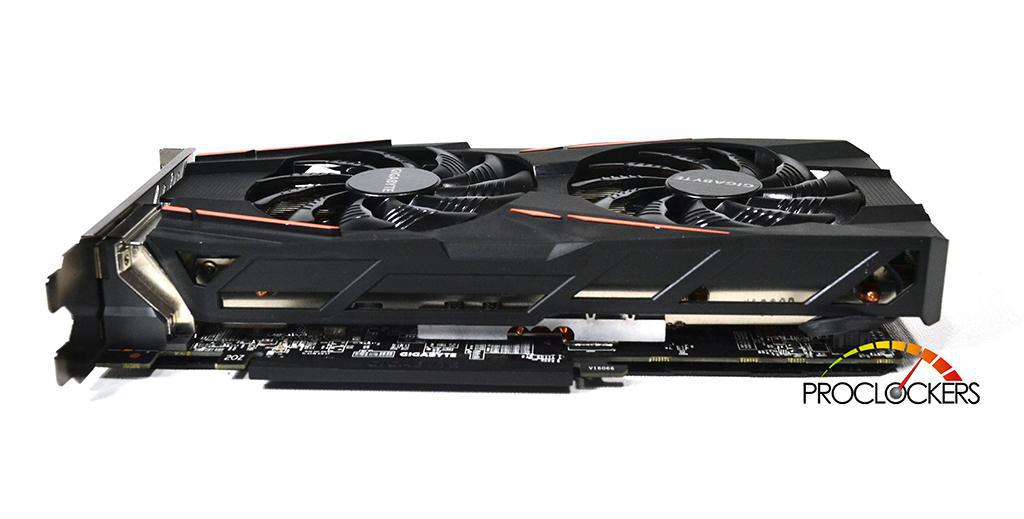
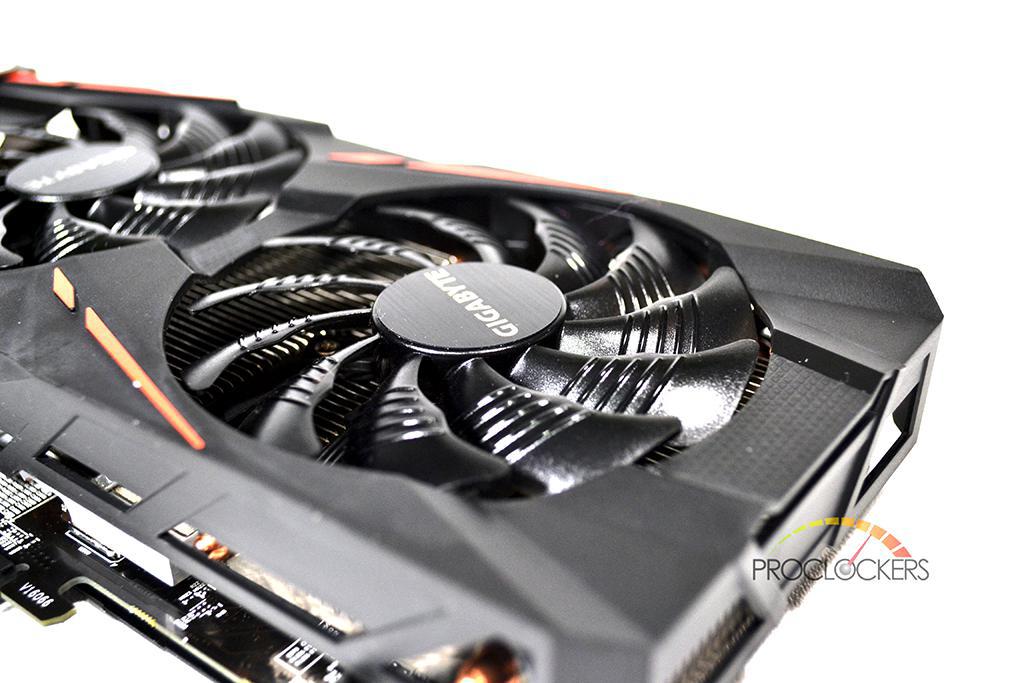
The Windforce cooler on the G1 Gaming RX 480 has 2 fans.
The Gigabyte RX 480 is a beautiful card. The distinct Windforce cooler can be identified by its black shroud with orange accents. In the case of the G1 Gaming RX 480, the Windforce cooler is sporting 2 fans that each measure 90 mm in diameter. The Windforce 2X cooler has an alternate spinning fan design. This cooler is designed to reduce air turbulence and effectively dissipate the heat.

This is a picture of how the 3D active fans work.
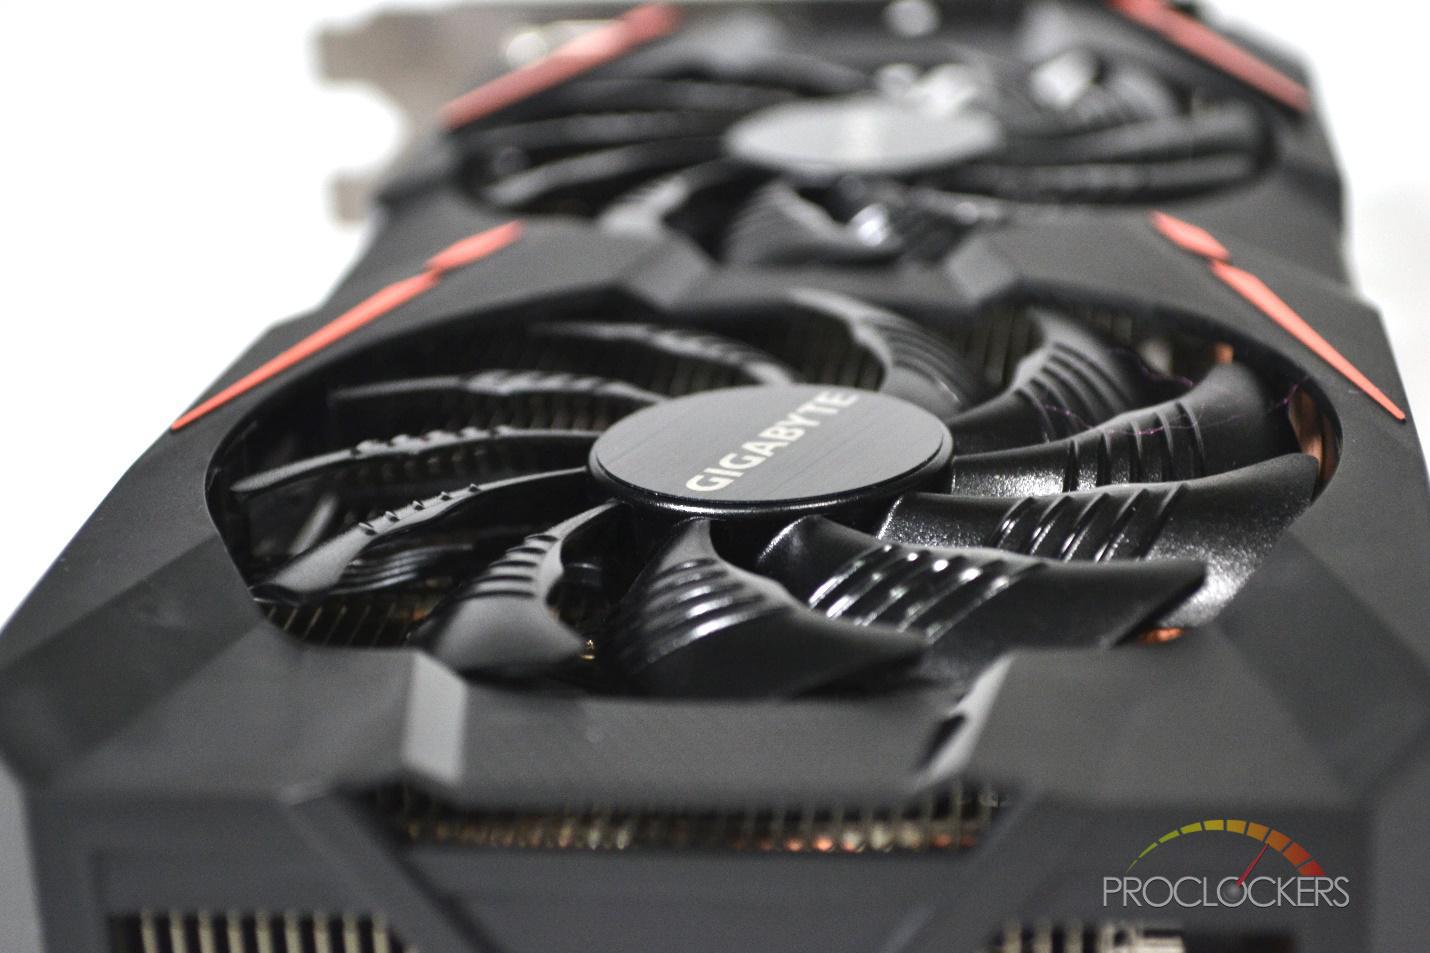
The airflow is split by the triangle fan edge, and sent through the 3D stripe curve on the fan surface.
The airflow is split by the triangle fan edge, and guided smoothly through the 3D stripe curve on the fan surface. This unique fans design increases airflow by as much as 23%, keeping the card running cooler than previous generations of the Windforce cooler. The semi-passive fans will remain off when the GPU is under a set loading or temperature for low power gaming. When the fans are off, the “Fan Stop” LED on the side of the cooler will illuminate.
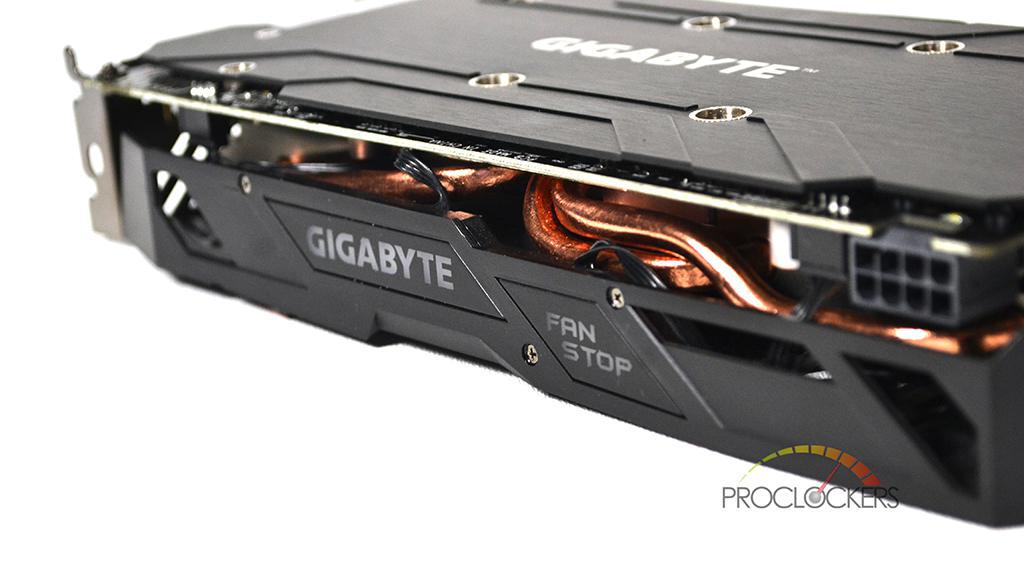
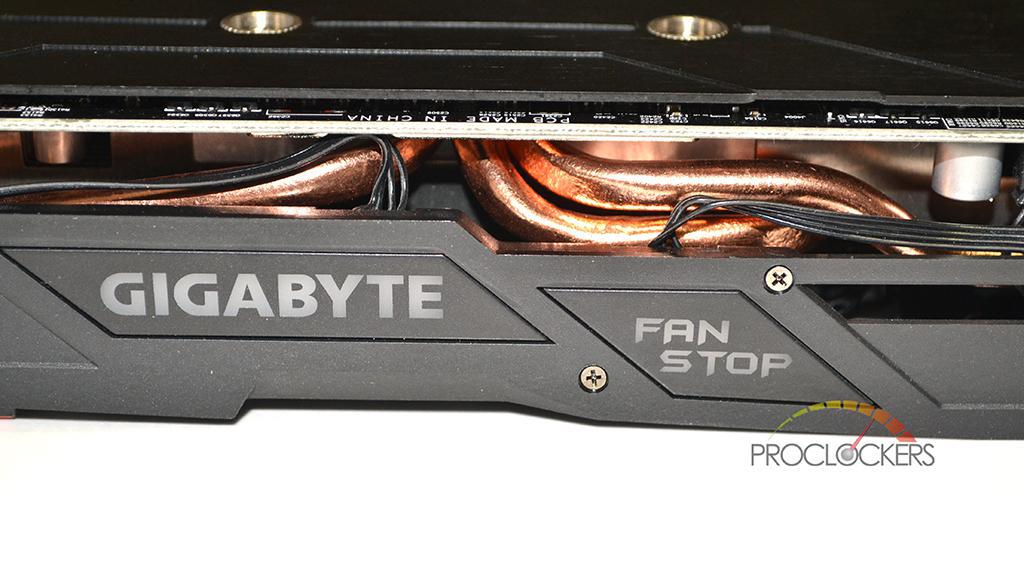
Right above the Gigabyte and Fan Stop LED you can see the composite heat pipes that make up the Windforce 2X cooler.
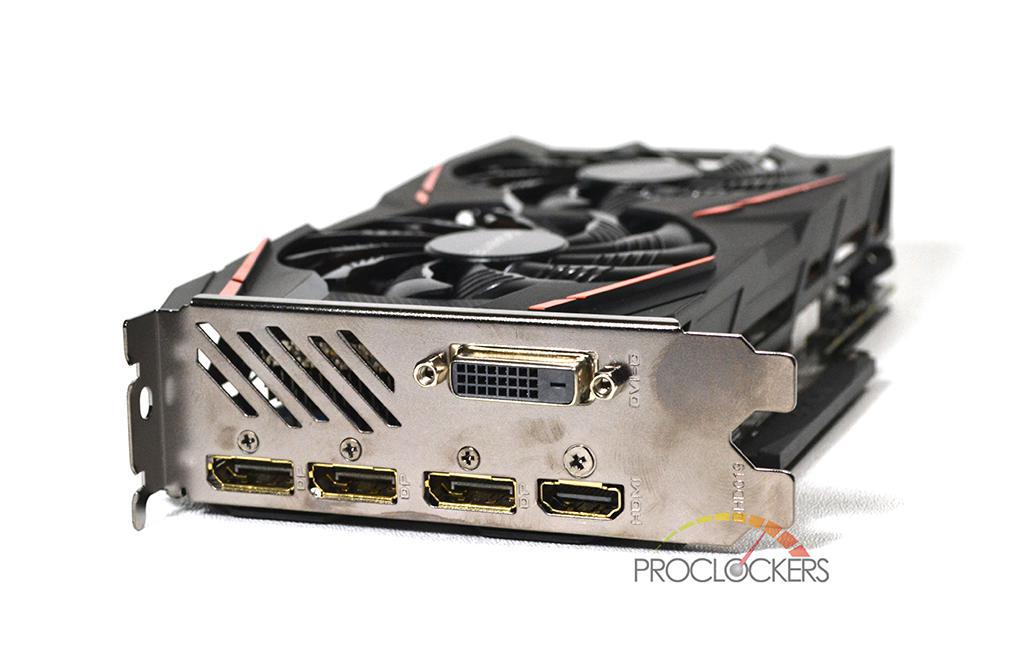
The G1 Gaming RX 480s IO consists of a single DVI-D, 3 Displayport 1.4 and a single HDMI 2.0.
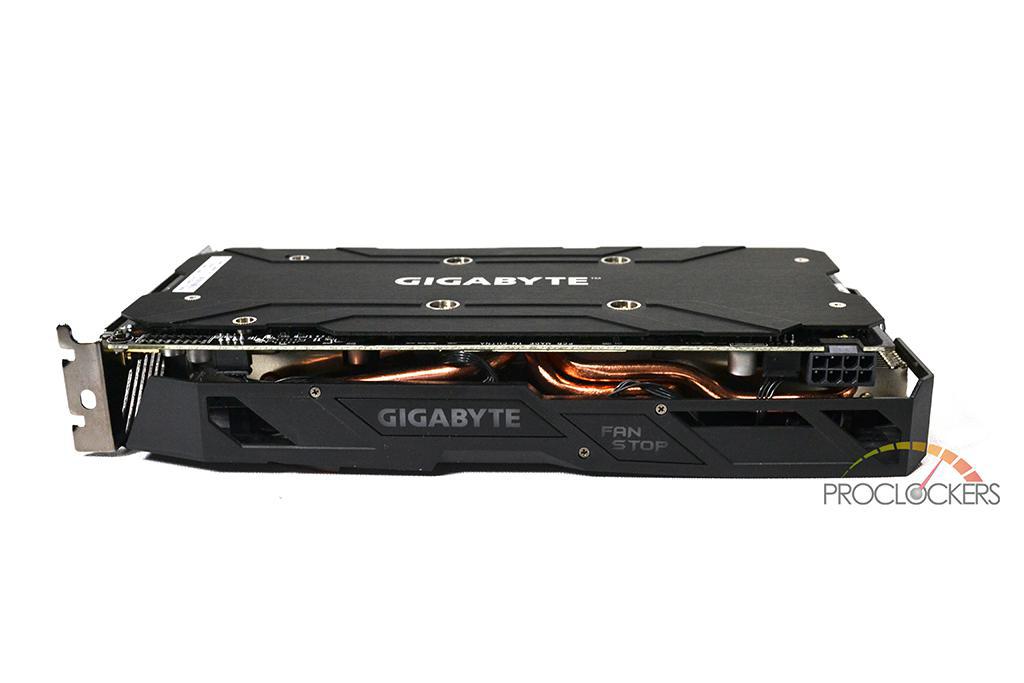
The top side of the card is where you find the LEDs and the 8-pin power connection.
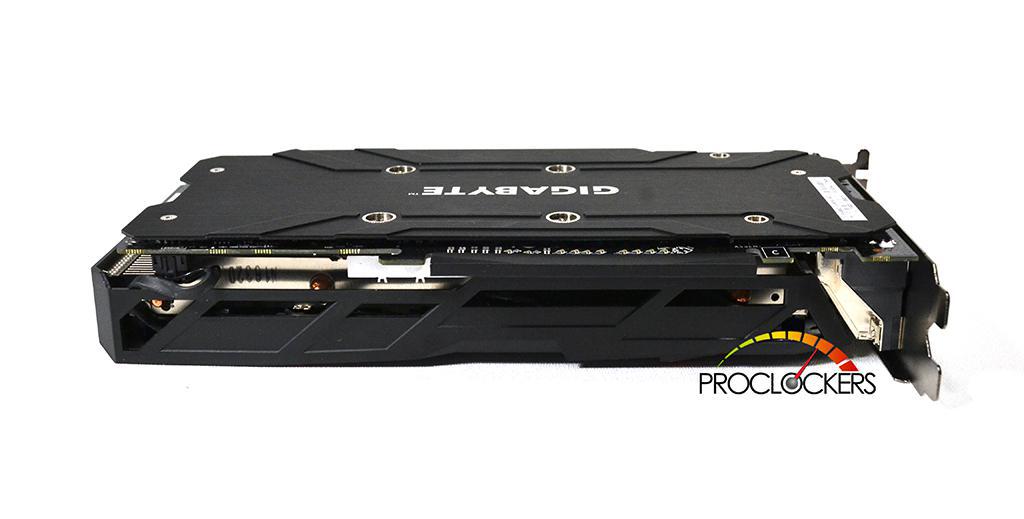
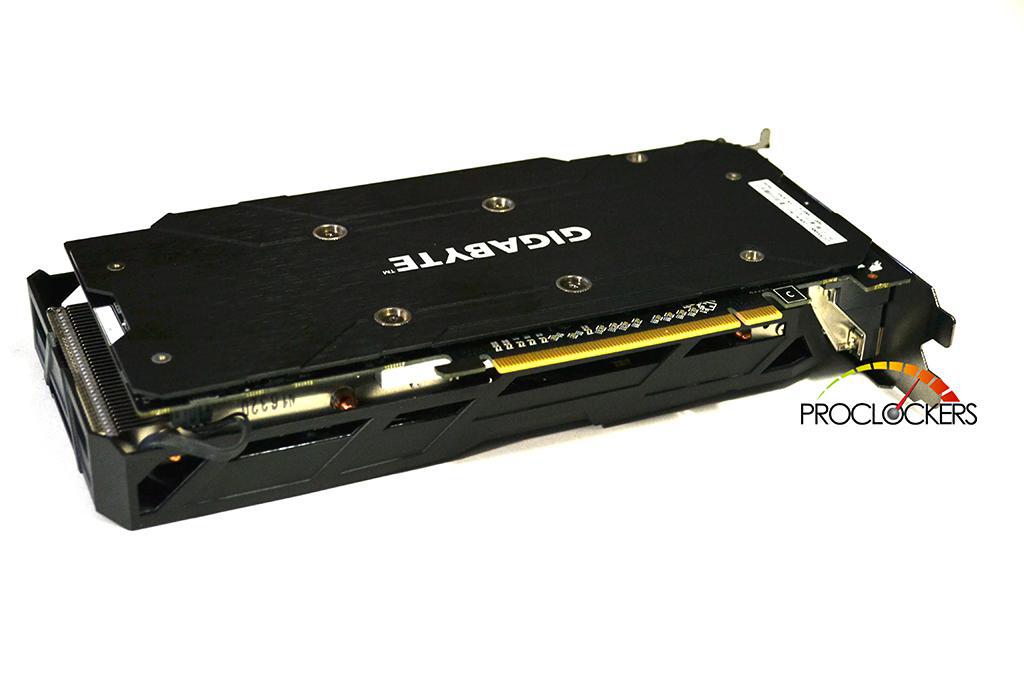
The bottom of the card has nothing but the PCIE connector.
In order to remove the back plate, you must first remove the cooler and remove the screws on the PCB that attach the backplate.
The bottom of the card with the Windforce 2X cooler facing up.
The Windforce Cooler comes equipped with 2 90 mm fans that spin in alternating directions.
On the side of the card, you’ll find both the Gigabyte Logo and the Fan Stop LED. I love the Fan Stop LED. The Windforce cooler is set to not run when the card is below a set load or temperature. This can be set in the Xtreme Gaming software. The fan stop LED prevents you from thinking there is something wrong with your card. Like the Gigabyte logo, the Fan Stop LED is an RGB LED. Both LEDs can be controlled using the Gigabyte Xtreme Gaming software available for download through Gigabytes website. On the opposite end of the card from the IO, the G1 Gaming RX 480 has a single 8-pin connection to power the card. I’m very happy to see the G1 Gaming RX 480 come with a full cover back plate. It’s a simple, matte black back plate with the Gigabyte logo in the middle. The IO seems to be standard as of late, consisting of a single DVI-D, 3 Displayport 1.4 and a single HDMI 2.0 and supports up to 4 displays.
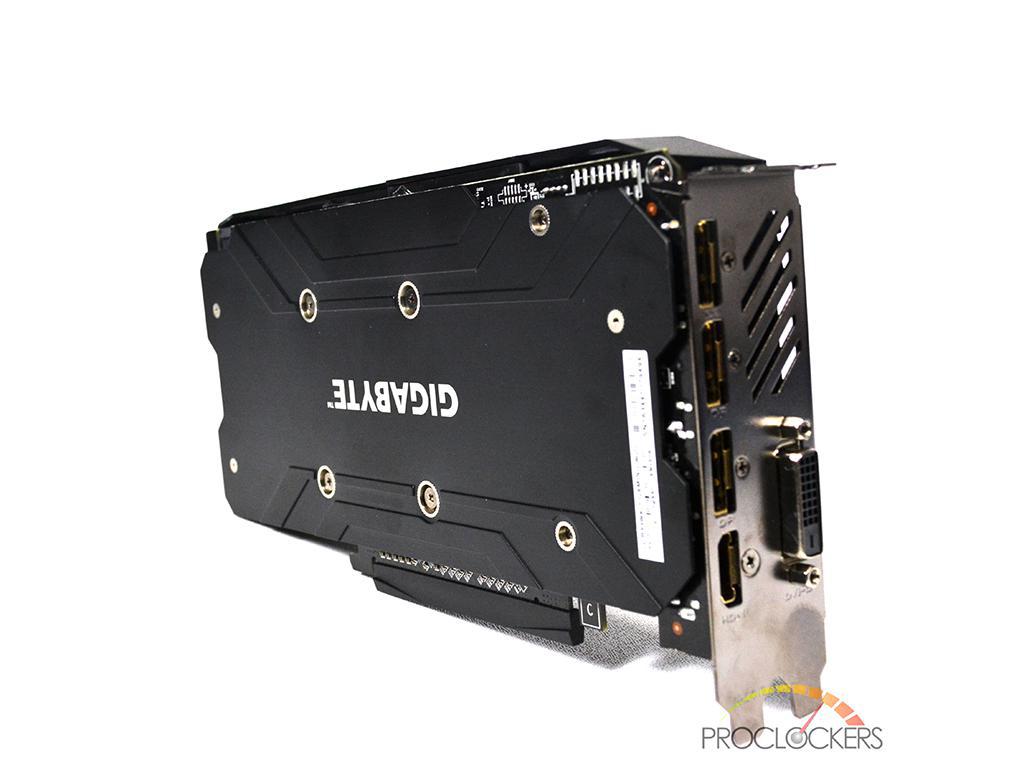
The backplate of the G1 Gaming RX 480 is matte with the Gigabyte logo in the middle. Simple but beautiful in my opinion.
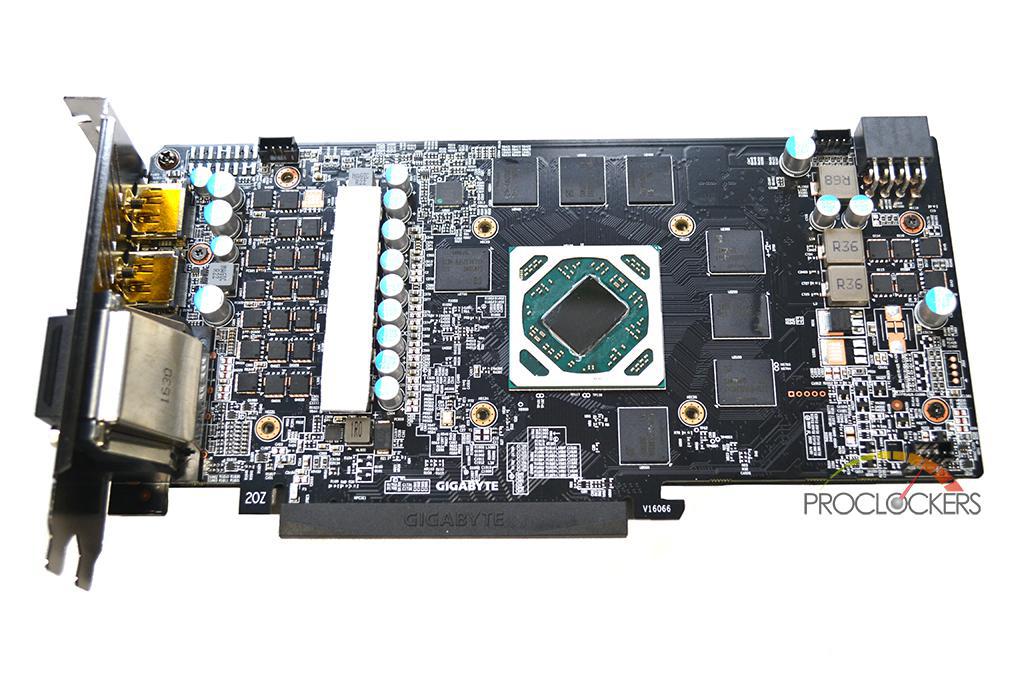
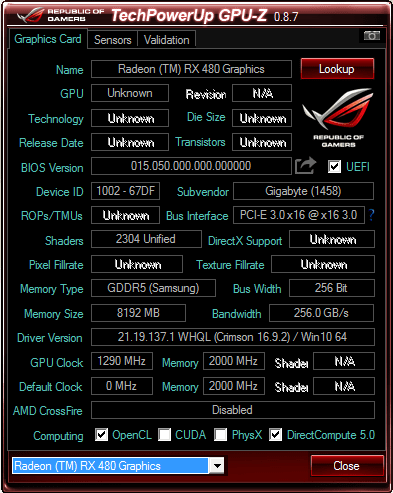
Underneath the 2 fans and the shroud, we find the heart of the Windforce cooler. For starters, The G1 Gaming RX 480 has a custom PCB with an 8-pin power connection with a 6+2 phase power delivery. The G1 Gaming RX 480 requires a 500 watt power supply. The GPU itself is based on AMD’s Polaris 10, 4th generation GCN architecture. Polaris 10 is a 14NM FinFET + process and is capable of over 5 TFLOPS of computer performance. The RX 480 comes with either 4gb or 8gb of GDDR5 on a 256-bit bus. The G1 Gaming RX 480 has a base clock of 1290 MHz a memory clock of an effective 8 Gbps / GHz, or 8,000 MHz. The RX 480 can support up to 5 monitors at a max resolution of 7680×4320. The RX 480 supports DirectX 12 and OpenGL 4.5 with backwards compatibility.
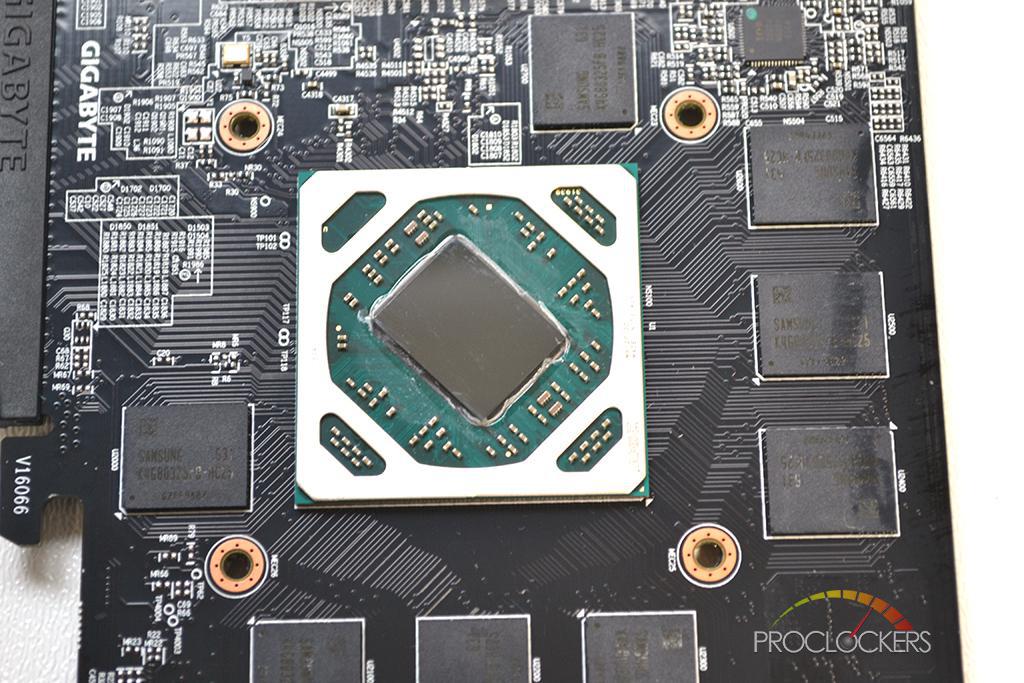
This is a die shot of the Polaris 10 GPU on the G1 Gaming RX 480.
Both the Gigabyte logo and Fan Stop LED are RGB and can be controlled in the Xtreme Gaming Software.
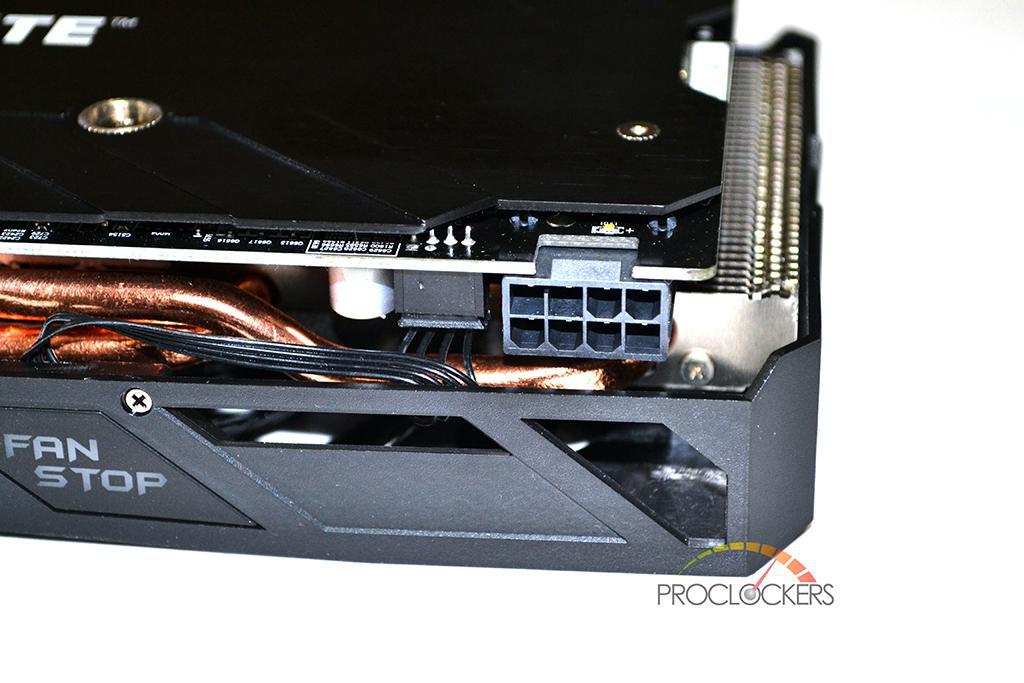
Unlike the reference card, which had only a 6-pin connection, the G1 Gaming has an 8-pin power connection. This was one of the factors in fixing the power draw issues that plagued the reference RX 480 at launch.
The Windforce Cooler is made up of 3 massive composite heat pipes, that meet up in the center of the cold plate. The composite heat-pipe combines both thermal conductivity and phase transition for efficiently managing the transfer of heat between two solid interfaces which increases 29% of cooling capacity. These heat pipes make direct contact with the GPU for maximize heat dissipation. There is a large heat sink made up of a series of dense fins fins that surround the heat pipes and help dissipate the heat. There are also thermal pads that cover the VRMs and Mosfets on the PCB for additional cooling capacity.
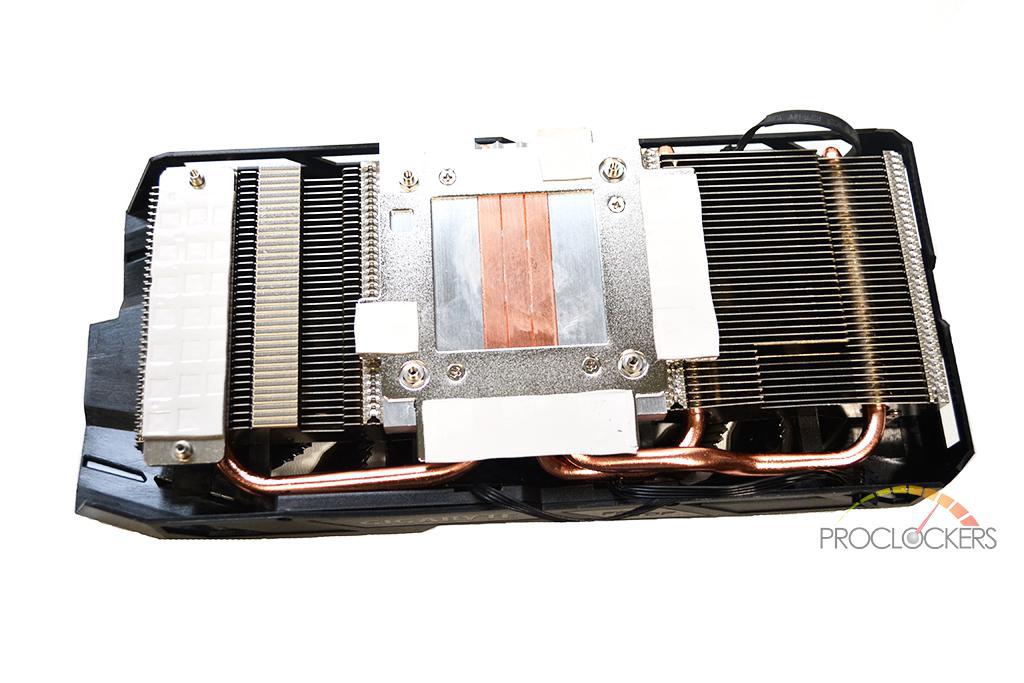
When you look at the underside of the WindForce 2X coolers heat sink, you see how large the heat sink is.
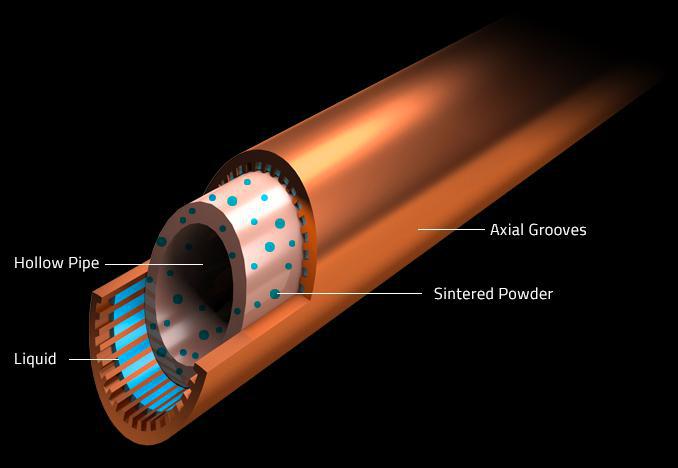
This is a diagram of what makes up the composite heat pipes on the Windforce cooler.
The custom PCB of the G1 Gaming RX 480 has a 6+2 phase power delivery and thermal pads to help dissipate heat from the Vram, Mosfets and VRMs.
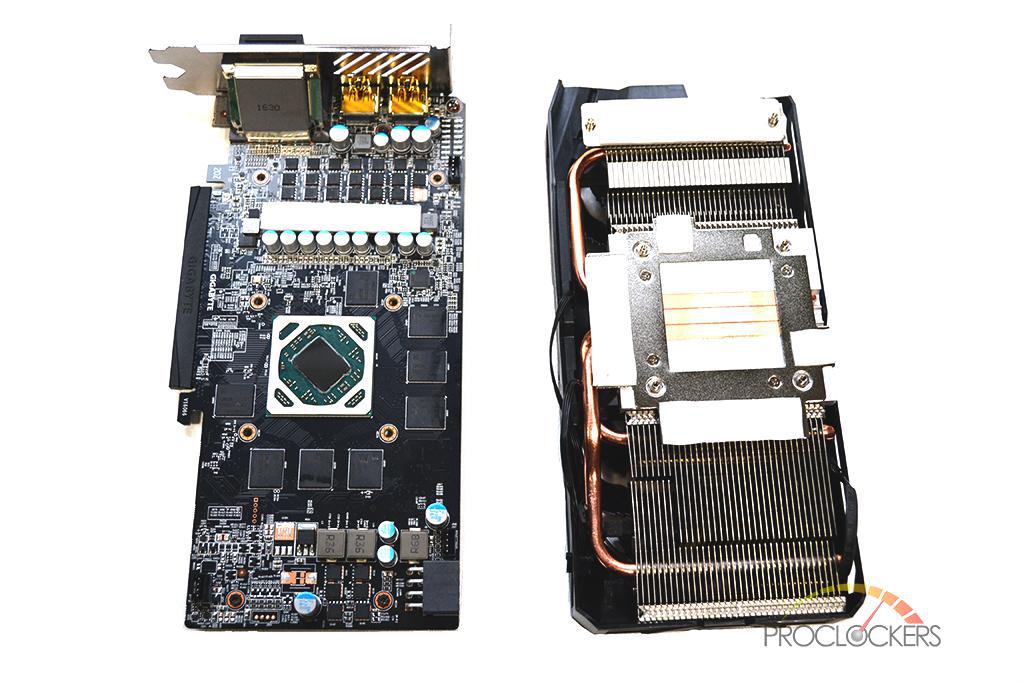
Here we seed a side by side view of the PCB and the Cooler.
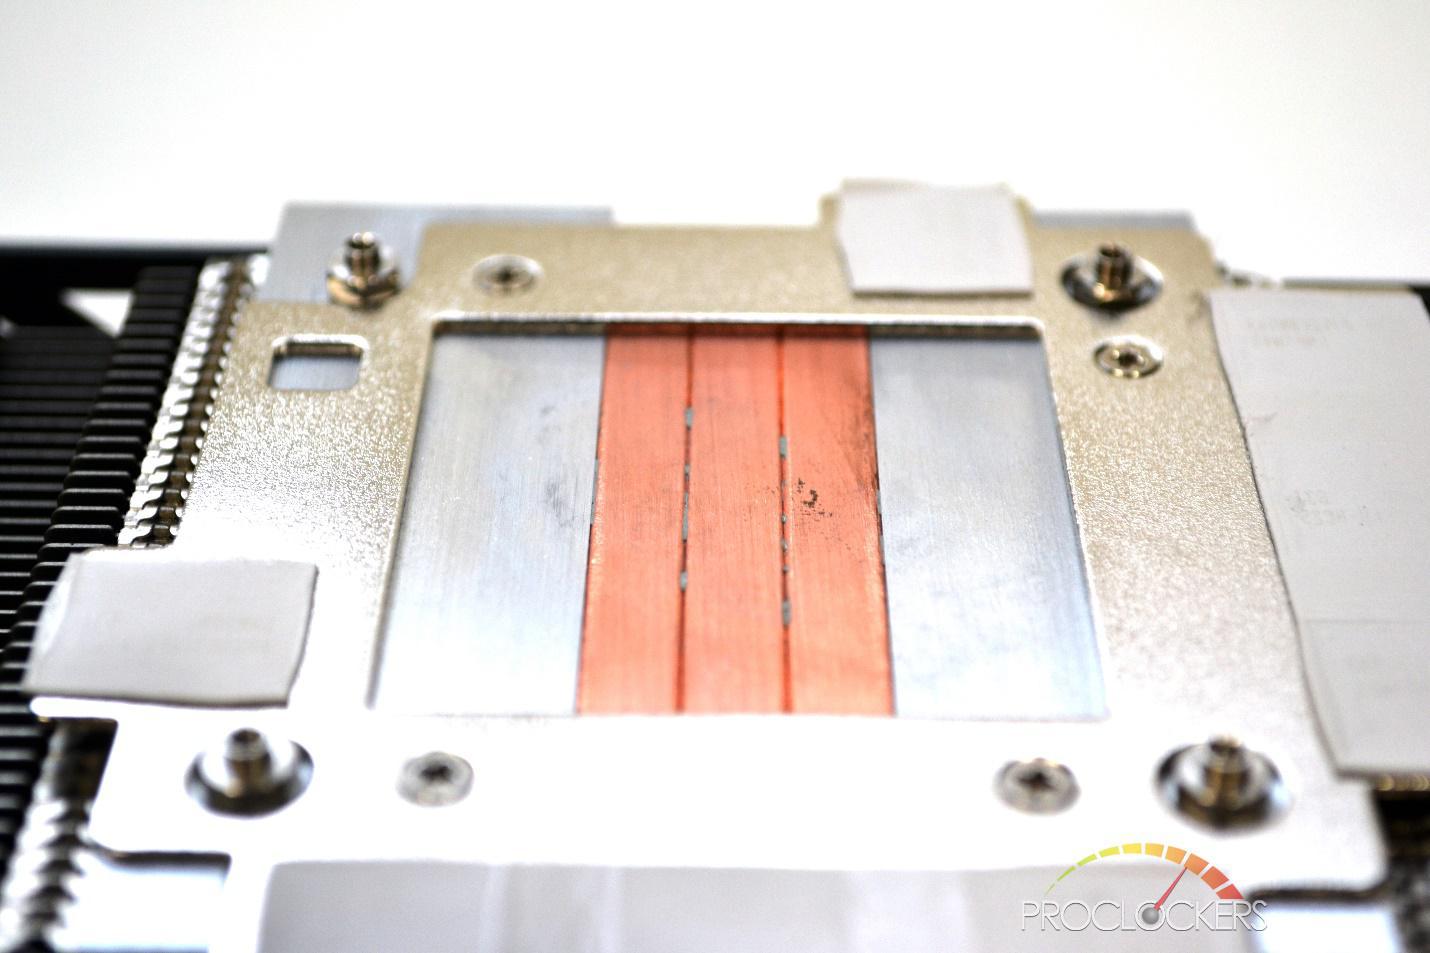
This close up of the contact area of the GPU shows the Windforce cooler was designed for the GPU to make direct contact with the copper heat pipes.
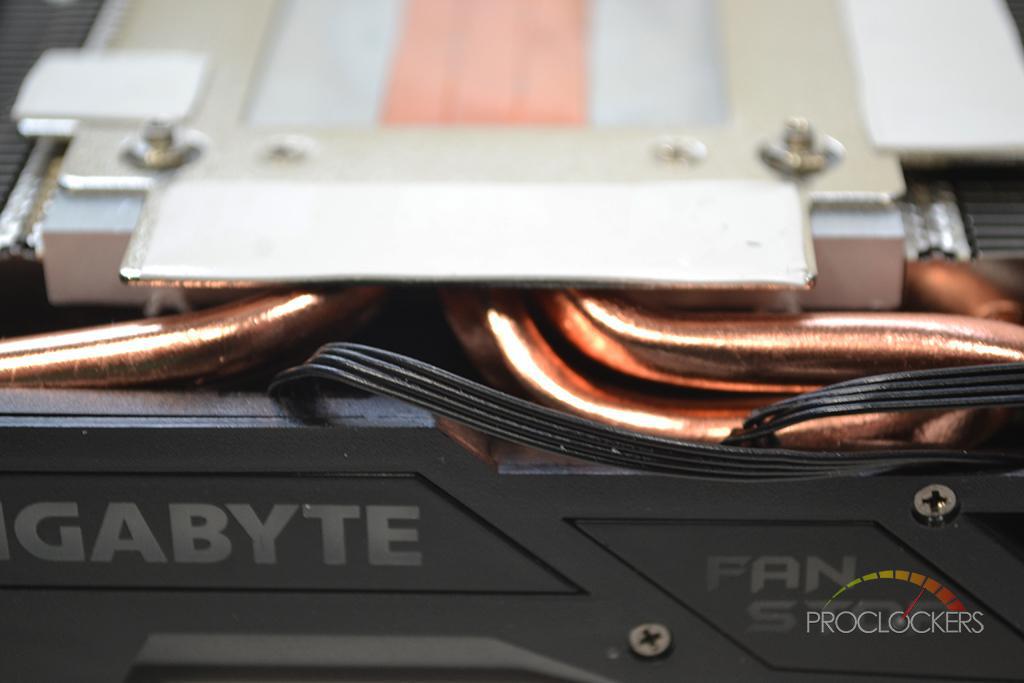
This picture shows how thick the actual heat pipes are as well as the thermal pads for the memory.
Gigabyte Xtreme Gaming Engine
Here is how the Xtreme Gaming Engine first looks when it’s opened.
The Xtreme Gaming Engine from Gigabyte is their software, much like the MSI Gaming App, where you can control every aspect of your Graphics Cards or peripherals from Gigabyte. I was first introduced to the software when I reviewed the XM300 gaming mouse from Gigabyte. In the Xtreme Gaming Engine, you can set profiles for the LED lighting on your graphics card and peripherals. You can change the color and the effects of the RGB lighting as well. The Xtreme Gaming Engine also has an automatic update feature for both firmware and software.
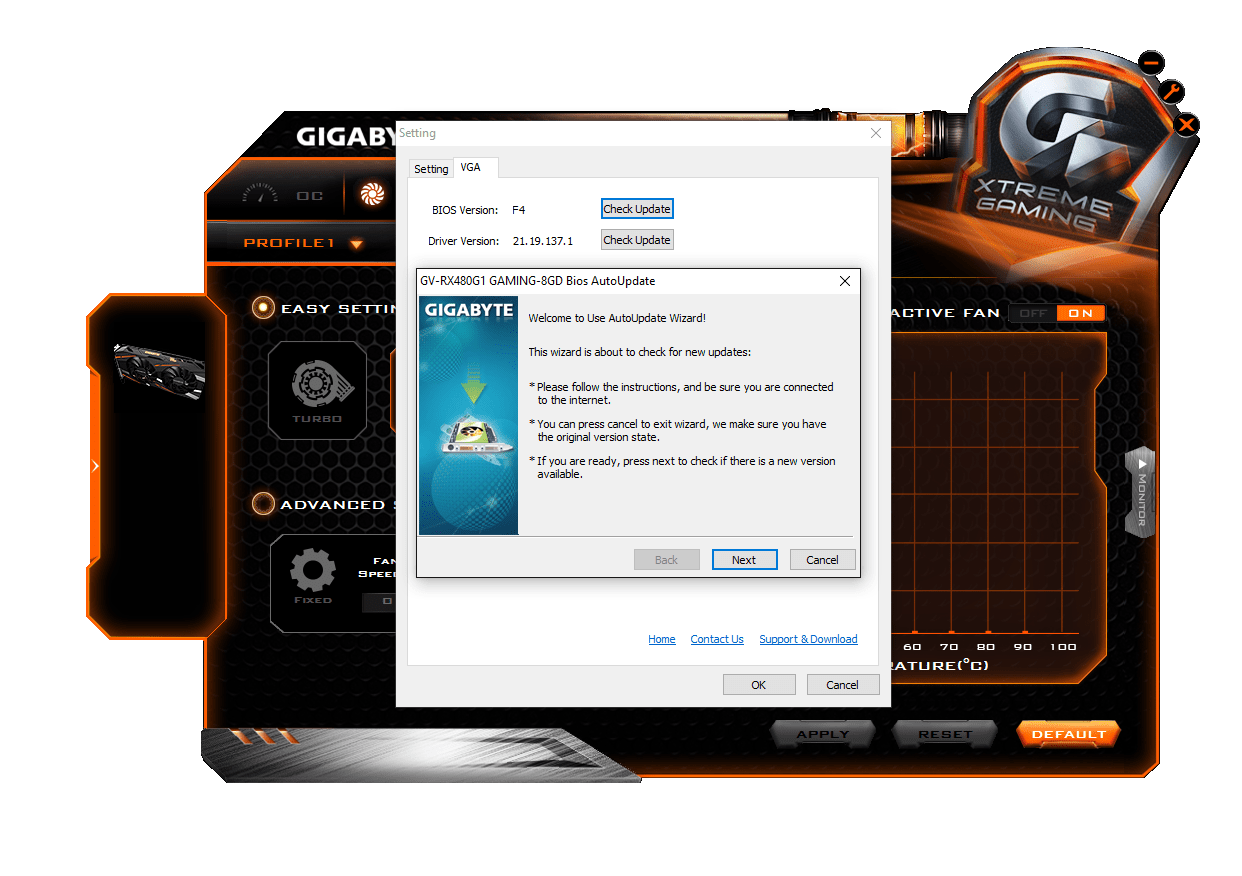
This is the Xtreme Gaming Engine’s update feature in the settings menu of the application.
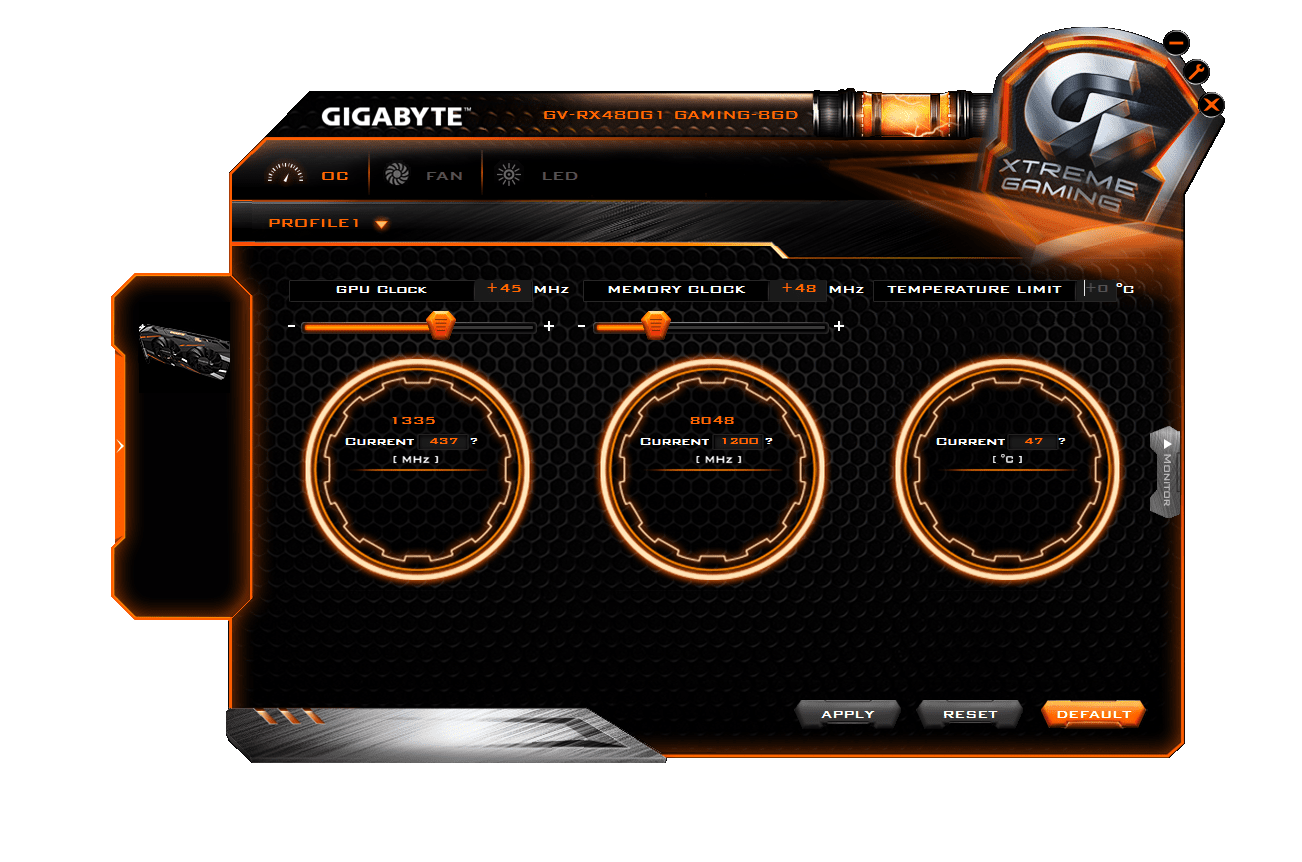
When you first open the application, you’re at a screen that shows you the different Gigabyte products you have connected to your compute. These could be anything from graphics cards, to keyboards and or a mouse. From there, you have a few options as to what you can do. If you chose a graphics card, The Xtreme Engine has its own Overclocking Utility that is extremely easy to use. This is where you’ll open up to.
Once you click on the picture of the graphics cards, this is where it’ll bring you.
Next, there is the Fan settings menu. Here you can use preset, or “Easy Settings” or Advanced settings. The easy settings have either auto or turbo settings. With Turbo, as soon as you get over a certain load or temperature, the fans ramp up to a max speed that you can set. With Auto mode, the fans will adjust up and down to keep the GPU under the set max temperature. You can also turn the 3D active fan feature on and off, as well as monitor and adjust fan curves.
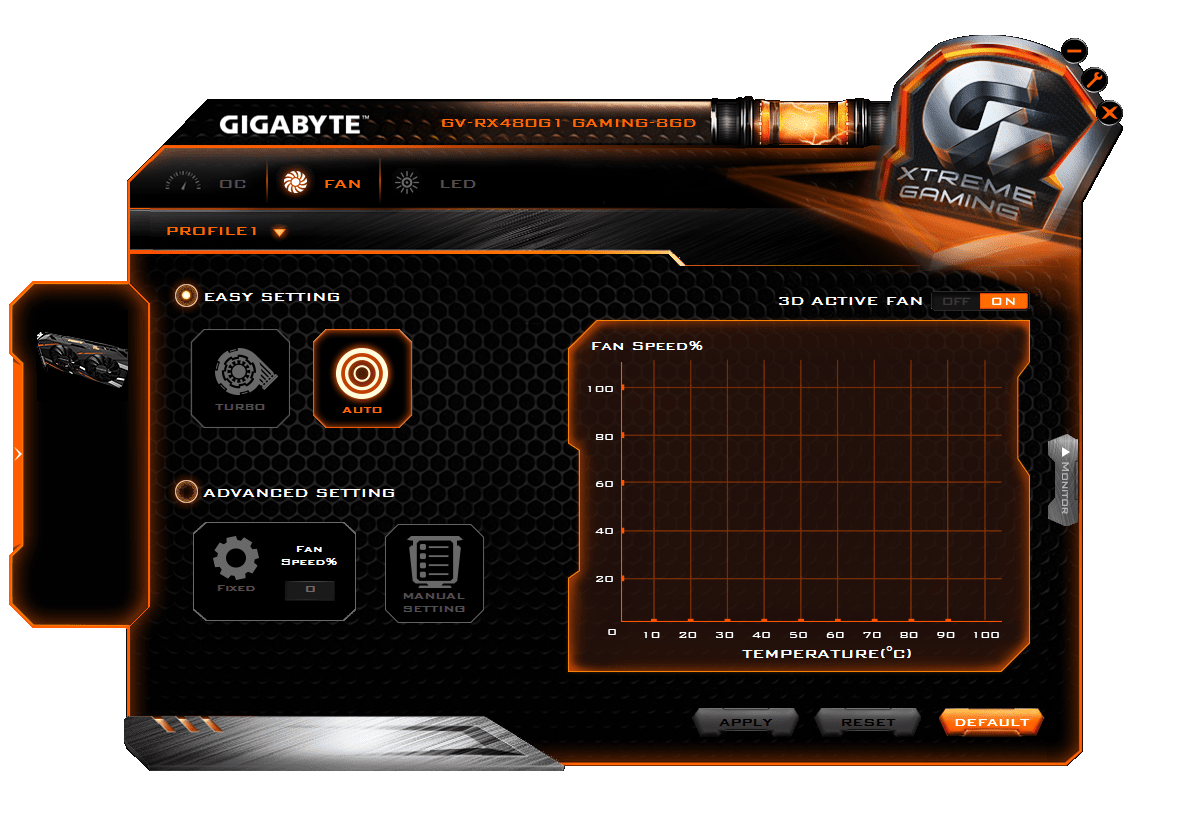
In this section, you can create custom fan curves and turn the 3D Active fans feature on and off.
The last section of the Xtreme Gaming Engine is the LED section. This is probably the most involved section. This is where you can select the effect of your LED lighting on the side of the card. It’s also where you’ll select the color for 16.8 million different colors in the spectrum. There are a number of different effects to choose from. They are Consistent, breathing, flashing, dual flashing, Variable Brightness, and Audio flashing. Some of these effects have different variations. They can be set to the GPU temperature, GPU Utilization, GPU Clock or Fan Speed. My personal favorite effect is the audio flashing. The LEDs will flash in the color of your choice to the beat of the game or music you’re playing at the time. You can also pick to use one or both of the LEDs. This is a great feature I wish all graphics cards had.
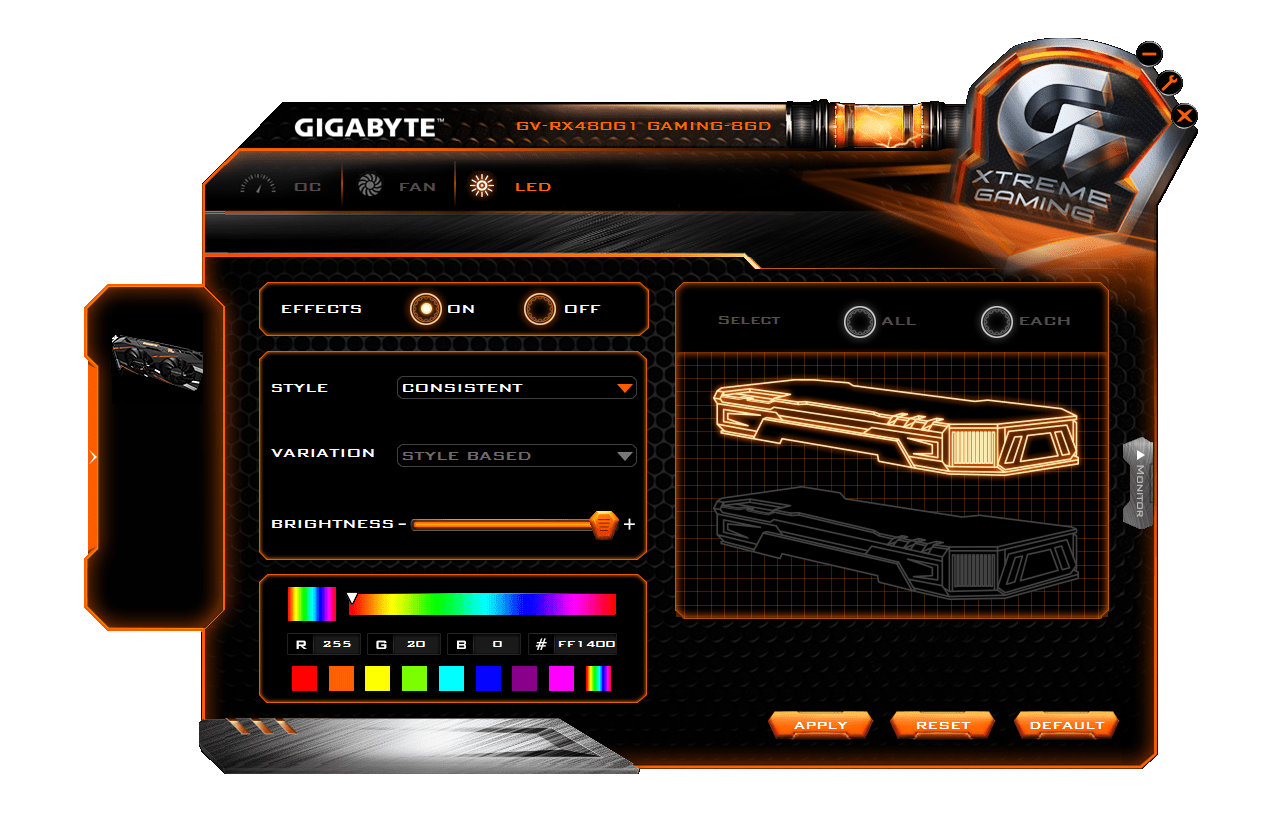
The LED customization for this card is amazing. With the different effects and variations, there are dozens of combinations you can customize.
System Configuration & Testing
Test System
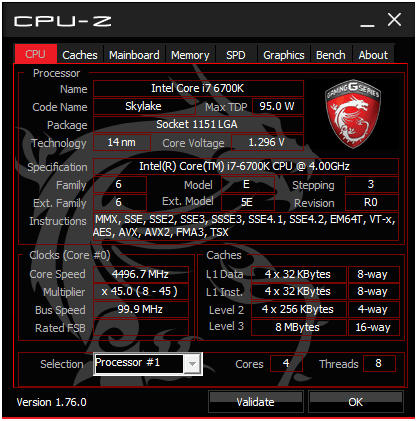
- Intel i7 6700k at 4.5 ghz @ 1.30 volts
- Gigabyte Z170X Gaming 5
- 32gb G.Skill Trident-Z DDR4 3200MHz
- Corsair HX850i 80+ Platinum PSU
- Swiftech H320‑X2 prestige AIO cooler
- SanDisk 240 gb SSD Ultra 2
- Primochill Praxis Wetbench
Test Software
- Windows 10 Professional 64-Bit
- CPUID – HWMonitor
- TechPowerUp – GPU-Z
- MSI Afterburner
Synthetic Benchmark
- Futuremark – 3DMark
- Maxon – Cinebench
- Unigine – Heaven
Game Benchmarks
- Bioshock Infinite G
- Crysis 3
- Grand Theft Auto V
- Shadow of Mordor
- Thief
- Tomb Raider 2013
- The Witcher 3
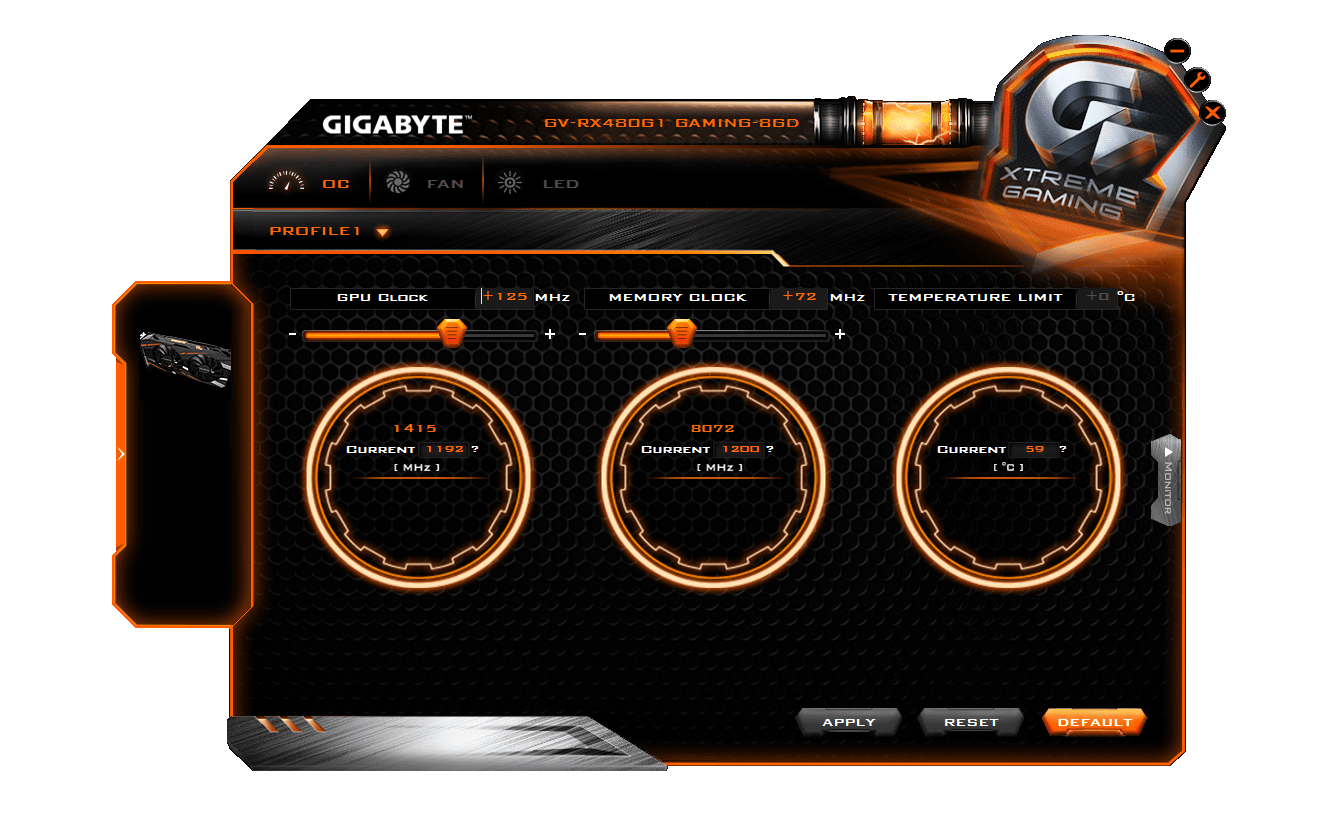
My Overclocking settings in the Xtreme Gaming App.
The testing environment is kept the same for all GPU reviews with the exception of the ambient temperature. As hard as I try to keep it the same, the ambient temperature was a cool 17°c during all testing. The GPU was kept at its stock clock during all testing, with one exception. Both Time Spy and Firestrike were run at stock and overclocked to +125 on the core, +100 on the memory and the power slider in Gigabyte Xtreme Engine. The G1 Gaming RX 480 has a base clock of 1290 MHz. This means The card was left on these settings for all gaming and synthetic benchmarks. For the synthetic benchmarks, I tested OpenGL, DirectX 11 and 12. For the Gaming benchmarks, the games were run in 1920 x 1080p. 2560 x 1440p and 3840 x 2160p. We use only full release drivers and software, meaning no beta drivers as they are usually not 100% stable. I used Windows 10 Professional due to it being the most recent operating system, as well as having DX12 support. All games were run on very high settings, with no MSAA or AA of any kind in any results. My original sample had a few issues. Gigabyte was great to work with through this process and provided me with a bios update, that is now available on their website. However, the bios update didn’t fix the issues I personally was having with my sample. This led to the card being RMA’d. I’m happy to repost that the new sample performs much better than the last one ever did, and also overclocks quite well compared to other RX 480s on the market.
3D Mark
3DMark is a computer benchmarking tool created and developed by Futuremark used to determine the performance of a computer’s 3D graphic rendering and CPU workload processing capabilities. It does this through a series of graphics and physics and or CPU tests. I Firestrike, the 3DMARK DX11 benchmark and Time Spy, the new DX12 Benchmark. Both benchmarks were run at stock clocks on the OC settings in the Gigabyte Xtreme Gaming APP. I also ran both benchmarks overclocked as well.
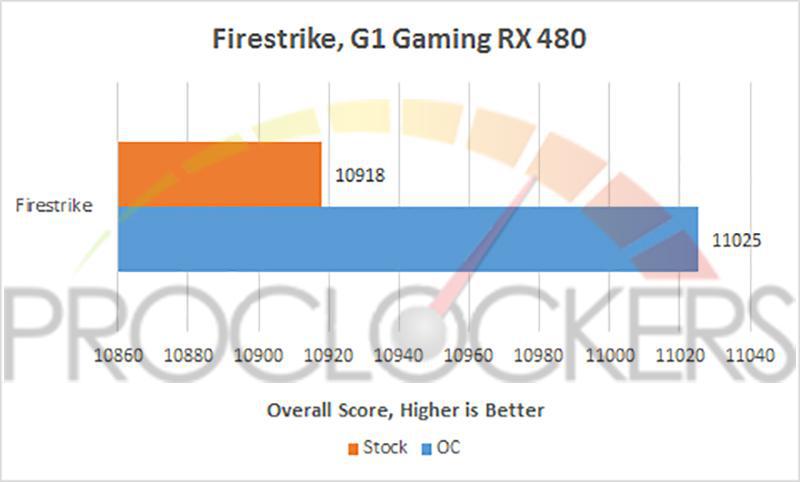
3D MARK Firestrike is a DX11 benchmark. Here are the results at stock, 1290 MHz, and overclocked to 1415 MHz.
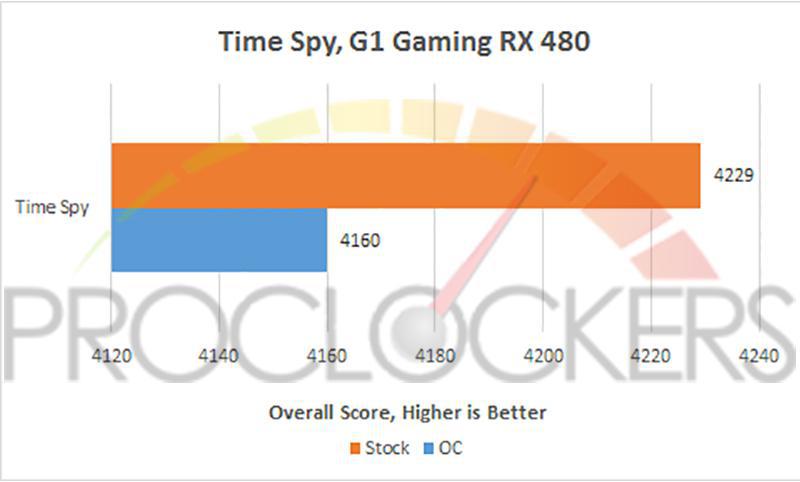
3D MARK Time Spy is a DX12 Benchmark. Here are the results at stock, 1290 MHz, and overclocked to 1415 MHz.
Maxon Cinebench R15
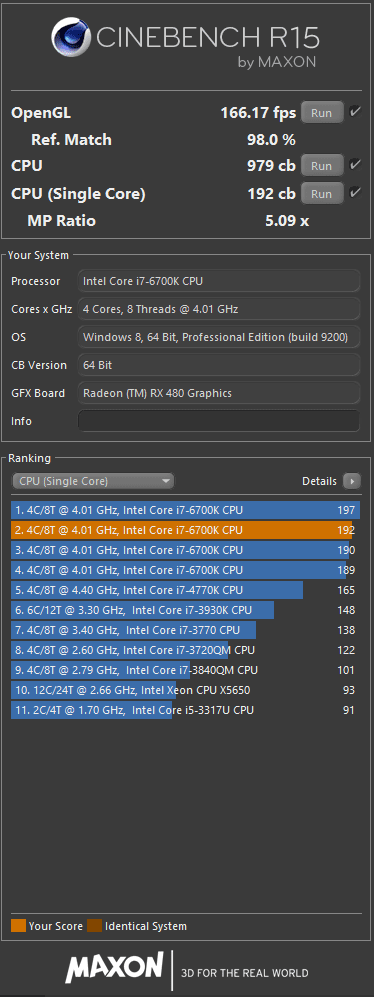
Cinebench is a synthetic benchmark evaluates your computer’s performance capabilities. It’s based on MAXON’s animation software Cinema 4D, which is used by studios and production houses worldwide for 3D content creation. I ran all aspects of Cinebench. First was their OpenGL GPU test in which the G1 Gaming RX 480 scored 166.17 FPS. I’m not so sure how accurate that score is considering the Gaming 1070 from MSI only scored 143.57 fps and my Pascal Titan X scored only 156.60. Second was the CPU test. This test maxes the CPU to 100% and tests its rendering capability. My 6700k scored 979 cb, on this run. Lastly was the Single Core performance of the CPU. On this run, the 6700k clocked at 4.5 ghz scored 192 cb.
Unigine Heaven
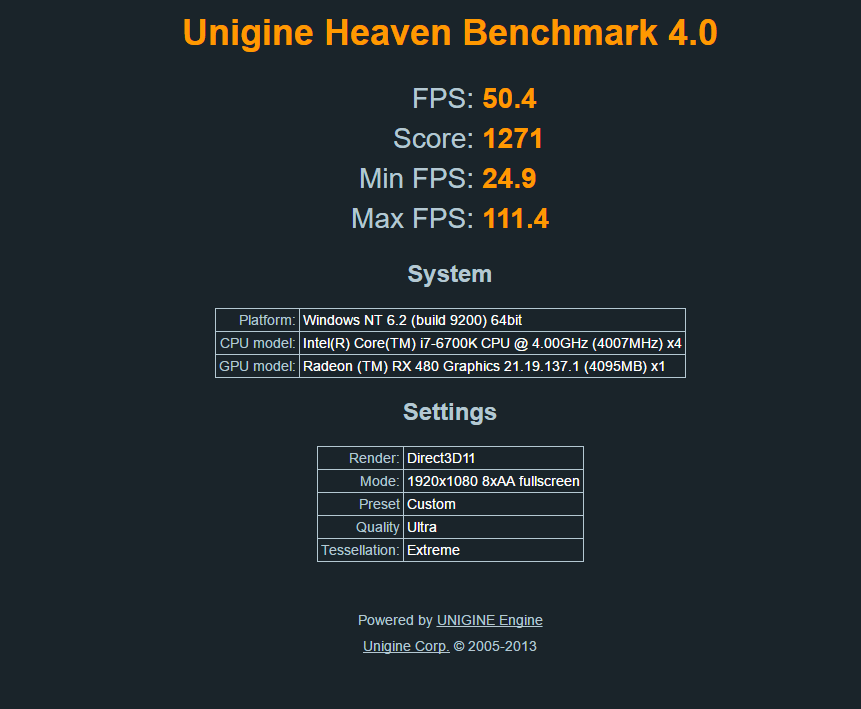
Heaven is a DirectX 11 benchmark that stresses your GPU under heavy load. It’s used in many cases to determine the stability of your GPU under stressful conditions, such as overclocking. Although the RX 480 isn’t considered a very high end card, it still performs great, especially at 1080p. The settings I used were extreme tessellation, 8XAA, 1920×1080 in full screen. The Heaven benchmark was run at the RX 480s stock speed of 1290 MHz. Overall, the G1 Gaming RX480 did really well in this test. It had a minimum FPS of 24.9, max FPS of 111.4 and an average FPS of 50.4. The G1 Gaming RX 480 scored a 1271 on the Unigine Heaven Benchmark.
Gaming Results
I tested my usual six games, all DirectX 11 titles. However, I also added in a seventh game, The Witcher 3. I added this game for its excellent graphics as well as its ability to hammer your system. They were tested in 1080p, 1440p, and 4k. All games were played on their Very High presets, or the settings below max. The one exception were the 4k results. They were run with no anti-aliasing. Each benchmark run was timed at 120 seconds. The games are as listed:
- BioShock Infinite
- Crysis 3
- GTA V
- Shadow of Mordor
- Thief
- Tomb Raider
- The Witcher 3
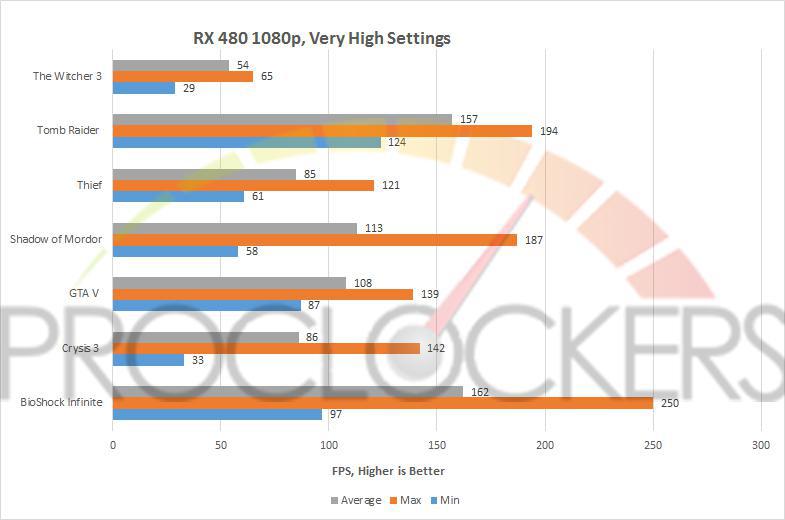
As you see, the G1 Gaming RX 480 did great in older games like Tomb Raider and BioShock Infinite. However, even in newer, more demanding titles like the Witcher 3, the G1 Gaming RX 480 produced more than playable framerates at Very High settings.
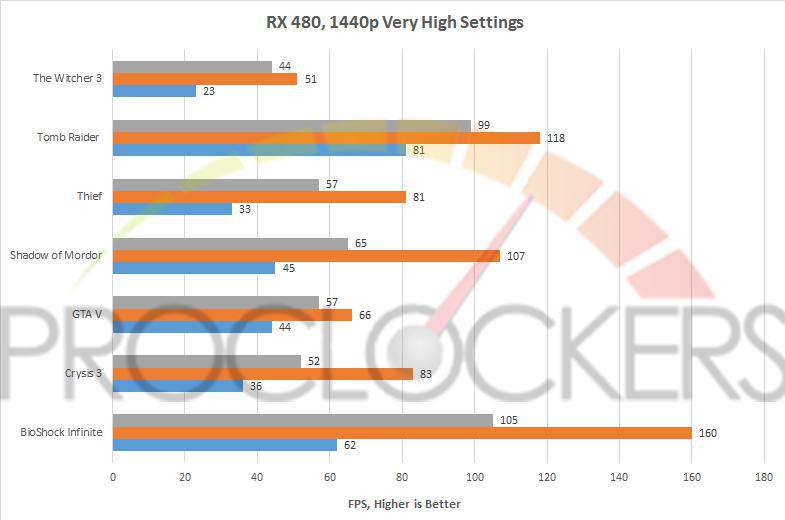
Although the G1 Gaming RX 480 did best at 1080p, it still did an excellent job at 1440p in the Very High presets. Most games even stayed over 60 FPS, and the rest very close to 60 as well. The lowest being the Witcher 3 at 44 FPS.
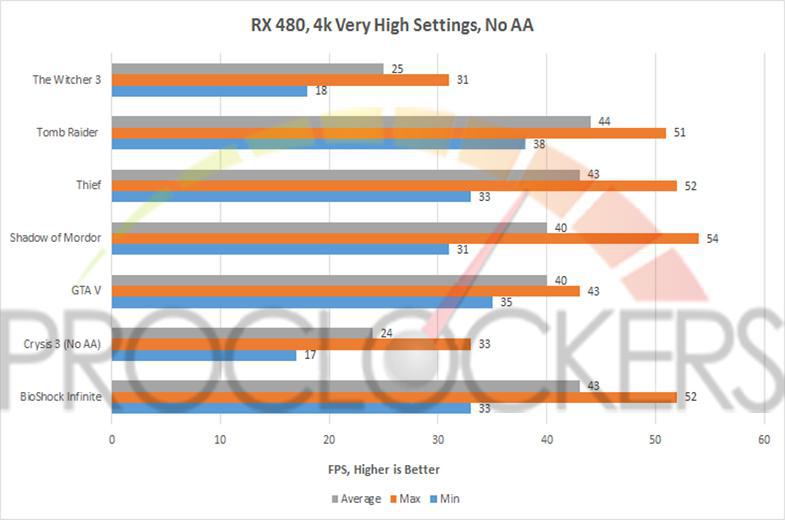
If you’re the type of gamer that can handle 30 FPS gaming, then the G1 Gaming RX 480 can even handle 4K. Only 2 games in my suite fell below an average of 30 FPS. The Witcher 3 and Crysis 3.
It was no surprise that the G1 Gaming RX 480 did best in 1080p. While older games did amazing like Bioshock Infinite averaging 162 FPS on Very High Settings, even newer, more demanding games did very well too. GTA 5 averaged 108 fps. Even though the original release was in 2013, it was just released on PC in 2015 with one of the most extensive graphics menu to date. I was very surprised to see the G1 Gaming RX 480 average well over 60FPS in Crysis 3 at 86 FPS in 1080p. Even the Witcher #, the newest game in my suite, hovered right around 60 FPS. After looking at the results, this card was clearly designed for 1080p gaming in mind.
However, that doesn’t mean it can’t handle 1440p, because it most certainly can. Where most of the games stayed below 60 FPS, it was only by a few frames. The lowest average at 1440 was Crysis 3. No surprise, but the best was an older title, Bioshock infinite. Even Shadow of Mordor with the 4K texture pack installed stayed over 60 fps at an average of 65 fps. If you’re planning on 4k gaming, then this probably isn’t the card for you. Although all games with the exception of the Witcher 3 and Crysis 3 stayed well over the 30fps mark. That tells me that with lower settings, all of these games are “playable” at 4k. However, I wouldn’t recommend buying a 200-300 dollar graphics card for 4k gaming anyway. Overall, I’d sat the G1 Gaming RX 480 did really well and even exceeded my expectations.
Mantle
Mantle is a low-overhead rendering API. AMD originally developed Mantle in cooperation with DICE, starting in 2013. Mantle was designed as an alternative to DirectX and OpenGL. Having only been supported for a short while and by only a handful of titles, Mantle showed great promise. The Vulcan API has recently replaced Mantle and has also implemented a number of features that made Mantle so interesting. Mantle was only supported by AMD cards.
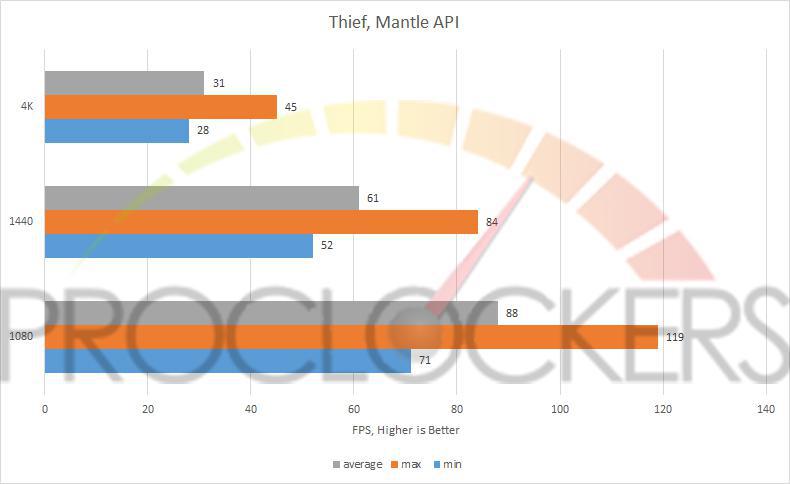
Although the overall results for Thief were similar, I did see higher minimum FPS and ever so slightly higher averages.
Temperatures & Overclocking
When my original sample arrived, I was disappointed in the overclocking ability of the G1 Gaming RX 480. However, it ended up being a defective card that Gigabyte was great about replacing form me. I had the replacement in about a week through their regular RMA process. Once the new card arrived, I updated the bios to version 7.00 on the Gigabyte support downloads page. After that, the card did a really good job overclocking compared to many other reviews I read on the RX 480. The G1 Gaming RX 480 I tested was able to achieve a +125 of a total of 1415 MHz on the core. However, this sample didn’t much like it when I tweaked the memory. I was able to get a +100 on the memory for an effective 8100 MHz clock speed on the Vram. It’s not the most mind blowing overclock, but it’s given me an increase in performance and that’s what matters. Even with an overclock sitting at 1415 MHz, my G1 Gaming RX 480 never went over 79°c.
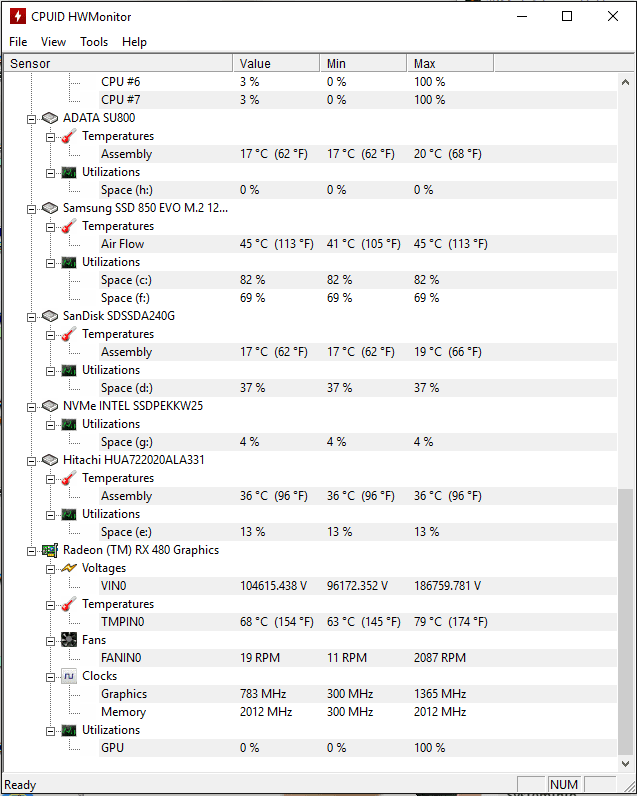
My temperate results for Hardware Monitor recorded a max temperature of 79°c. This while at 100% GPU Utilization.
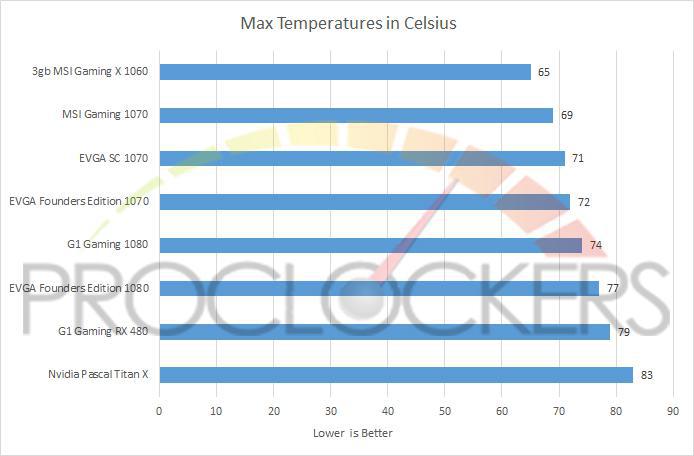
Max Temp at 100% utilization was 79°c.
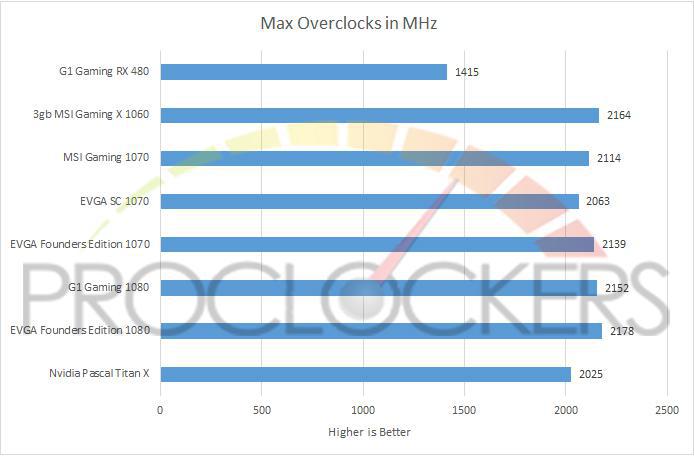
My G1 Gaming RX 480 hit 1425 MHz using the Extreme Gaming Engine.
Final Thoughts & Conclusion
The backplate of the G1 Gaming RX 480.
I’ve always been of the mind to buy the most expensive card money can buy. This way there is not worries on whether or not my system can run a specific game or not. However, with the advances in GPU technology, graphics cards have come such a long way. Especially the mid-ranged cards. The G1 Gaming RX 480 performed amazing in 1080p and even surprised me in 1440p. Where this card was never meant for 4K gaming, I was also surprised to see it stay above 30FPS in the majority of games in 4K. At the time of this review, you can pick up the 8 gb G1 Gaming RX 480 at a price point of only $269.99 on Amazon with free shipping. I’d dare to say that the G1 Gaming RX 480 could be the best price to performance card on the market today. This is why I’ve awarded the G1 Gaming RX 480 the Proclockers “Best Value” award.Whether you’re looking to build a budget build or jump to something a bit newer, the G1 Gaming RX 480 is a great choice!


The 25 Best Anime Cats, Ranked
What are the best anime cats? Cats are something you either love with every fiber of your being or vehemently...


The 25 Best Anime Teachers, Ranked
Who are the best anime teachers? With high school being such a prevalent setting in anime, it makes sense that...


The 25 Best Orange Hair Anime Girls, Ranked
Who are the best orange hair anime girls? Orange hair is interesting in anime because it can either be a...