
Hardware
Thermaltake S500 Review
Introduction
When first starting to plan out your build, one of the first pieces you select is your PC case. When selecting a PC case, you want to make sure that it will meet your current needs and be flexible enough to handle your future needs as well. Some things you may want to consider looking for would be an ample amount of space, sufficient configurability, and maybe something that aesthetically fits your build theme.
One case that checks all the boxes is Thermaltake’s new S500. The S500 features a clean modern look that easily matches almost any build theme, flexibility to handle both vertical/horizontal GPU orientation, and has plenty of room for your components/water cooling parts since it’s a full tower chassis. Some of the other notable features include tempered glass side panel, PSU shroud, HHD drive cage, and support for motherboard sizes up to ATX. Even with the S500 being a full tower case, it still maintains an affordable MSRP of $119.99.
Thermaltake’s Take on The S500
The S500 Tempered Glass Edition mid-tower chassis combines sophistication and elegance. It’s built with a modern steel case construction and fitted with one tempered glass side panel. Two preinstalled standard fans are included, one 140mm positioned at the front and one 120mm positioned at the rear to enable outstanding ventilation. S500 TG incorporates a fully modular design, vertical radiator & GPU mount, Patented Rotational PCI-E slots, and the support for 200mm fans. The flexibility is limitless for high-end components.
For storage, this case has four drive trays with modular drive racks, delivering advanced storage capacity and great liquid cooling expansion. S500 TG is a great fit for users who are looking for a modern and stylish chassis.
Thermaltake S500 Features and Technical Specifications


Technical Specifications:
| P/N | CA-1O3-00M1WN-00 |
| SERIES | S Series |
| MODEL | S500 TG |
| CASE TYPE | Middle Tower |
| DIMENSION (H X W X D) | 565 x 240 x 500 mm |
| (22.2 x 9.4 x 19.7 inch) | |
| NET WEIGHT | 15.04 kg / 33.15 lbs. |
| SIDE PANEL | 4mm Tempered Glass x 1(Left) |
| COLOR | Exterior & Interior : Black |
| MATERIAL | SPCC |
| COOLING SYSTEM | Rear (exhaust) : |
| 120 x 120 x 25 mm fan | |
| (1000rpm, 16 dBA) | |
| Front (intake) : | |
| 140 x 140 x 25 mm fan | |
| (1000rpm, 20dBA) | |
| DRIVE BAYS | |
| 2.5” x 2 or 3.5”x 2 (HDD Rack) |
| 2.5”x 1(HDD Bracket) ; 2.5” x 2 or 3.5” x 1(HDD Bracket) |
| EXPANSION SLOTS | 8 |
| MOTHERBOARDS | 6.7” x 6.7” (Mini ITX), 9.6” x 9.6” (Micro ATX), 12” x 9.6” (ATX) |
| I/O PORT | USB 3.0 x 2, USB 2.0 x 2, HD Audio x 1, Reset Button x 1 |
| PSU | Standard PS2 PSU (optional) |
| FAN SUPPORT | Front: |
| 3 x 120mm, 3 x 140mm, 2 x 200mm | |
| Top: | |
| 3 x 120mm, 2 x 140mm, 2 x 200mm | |
| Rear: | |
| 1 x 120mm | |
| RADIATOR SUPPORT | Front: |
| 1 x 360mm, 1 x 420mm | |
| Top: | |
| 1 x 280mm, 1 x 360mm | |
| Rear: | |
| 1 x 120mm | |
| Right: | |
| 1 x 360mm (Without HDD Rack) | |
| CLEARANCE | CPU cooler height limitation: 172mm |
| VGA length limitation: 282mm(With HDD Rack) | |
| 400mm(Without HDD Rack) | |
| PSU length limitation: 220mm |
Thermaltake S500 Exterior, Interior and Accessories
Packaging and Unboxing
Our S500 arrived at the doorstep in a plain brown box with a profile shot of the case on the front. Please note that our box got pretty banged up during shipping and yours should look much better!

On the side of the box we can find the list of specifications for the S500 which includes items like case size, fan support, radiator support, and various clearance measurements.

Despite our box being pretty banged up, the S500 arrived unharmed mainly due to the fact that it was protected by two pieces of thick foam on either side of the case.

Stored within the S500, was a white box which housed the accessories for the case which included:
- User guide
- Zip-ties
- Various case screws
- PSU strip stand
- Buzzer

Now that the S500 has been unboxed, all that is left is to peel off is the plastic film from the tempered glass.

A Closer Look – Exterior
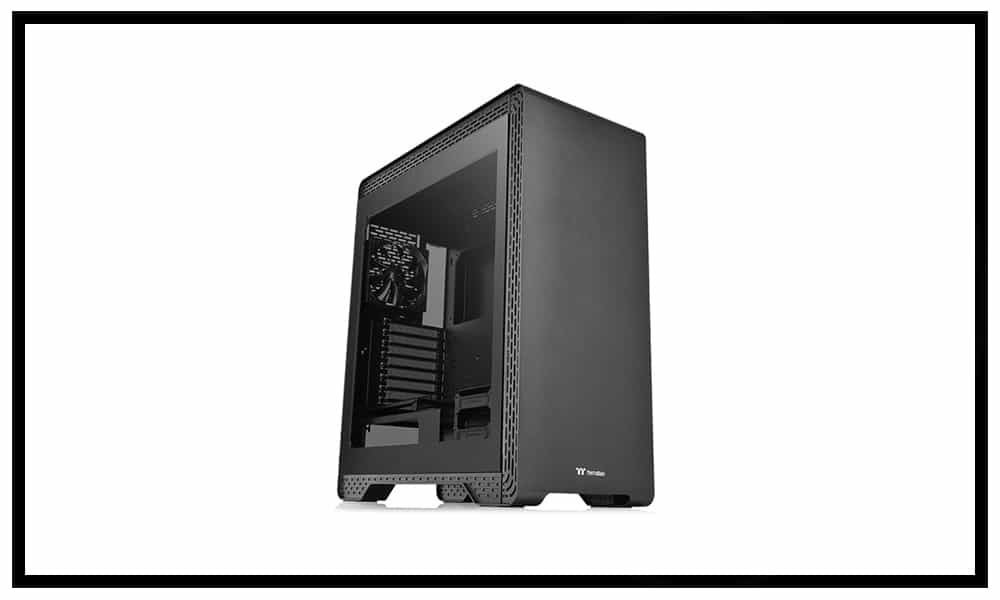
Like the A700, the S500 features an almost seamless finish on the front and top of the case, which we personally think looks stunning. The one main difference between the S500 and the A700 when it comes to finish is that the S500 is black whereas the A700 has a deep gray tone to it. Personally, we think both finishes look exceptional and the fact that they are near fingerprint-proof is a huge plus. Looking at the left-side panel of the case, the S500 features a full tempered glass window which gives you a full view of your build. We like the fact that Thermaltake chose to attach the tempered glass via the inside of the case so that there is no obstruction on the window itself. Around the outer edge of the case, we find cutouts on the bottom, front, and top which act as ventilation for the S500.

Rotating the S500 to view the front, we see Thermaltake kept the design extremely clean with the only marking being the TT logo at the bottom. We love the clean look of the S500 and even though Thermaltake sacrifices some airflow by not adding in extra ventilation, it’s well worth it in terms of aesthetics.

Rotating to the right-side panel, we can see that it looks very similar to the front of the case with its extremely clean design. However, this side includes ventilation cutouts all along the outer rim of the case, from top to bottom. On this side, the tempered glass panel has been replaced with a matte black steel panel.

Rotating now to the back of the case, you find your common I/O cutout, PSU cutout, and PCIe slots as seen in most cases. A couple differences you may notice on the S500 are that the PCIe slot can be rotated which enables you to mount your GPU vertically, and there is a removable PSU bracket so you can install the PSU from the back of the case.


Flipping the case over, we can check out the bottom. There are four feet, each of them fitted with a nice rubberized disc making the case slip-proof. Also, located at the center of the base is the removable dust filter.


The top of the S500 keeps that same sleek black finish matching the front and also includes the cases I/O. Scanning from left to right the I/O consists of:
- Reset button
- 5mm audio jack
- 5mm microphone jack
- Red HDD LED
- Power button
- 2 x USB 2.0 ports
- 2 x USB 3.0 ports

A Closer Look– Interior
Moving to the interior of the S500, we see it’s finished with the same matte black as the exterior of the case. Inside, there is also a motherboard tray that can support up to an ATX sized board. Looking at the bottom, we find a windowed PSU shroud and an HDD cage that can support up to two 2.5”/3.5” drives. If you are going to run an AIO or water-cool your build, there is also a radiator mount above the HDD cage. This mount can support up to a 360mm AIO/radiator if the HDD cage was removed.

Looking at the top of the PSU shroud, we see a vertical PCIe bracket that comes preinstalled just like the A700. If you wish to vertically mount your GPU, you can do so by rotating the PCIe bracket at the back of the case and install your GPU with a riser cable (not included) on the interior PCIe bracket. Beside the PCIe bracket, is a 2.5” HDD mounting plate which is great if you have a drive worthy of being shown off.

At the back of the case is a single 120mm fan that comes preinstalled.

Checking out the front, there is another single pre-installed fan. This fan is a 140mm version with mounting points for two more. The mounting point at the front can also support up to a 360mm radiator, three 120mm fans, or two 200mm fans.

Looking at the top of the case once more, we find mounting points for up to a 360mm radiator, and/or three 120mm/140mm fans, and two 200mm fans.

Lastly, spinning the S500 to the back-side, we see plenty of tie-downs throughout the back of the motherboard tray with the center three including black Velcro straps. Also attached to the back of the motherboard tray is a single HDD mounting bracket with support for up to two 2.5” drives or a single 3.5” drive. For cable routing options there are a few cutouts at the top of the case and three rubber grommets in the center.

Thermaltake S500 System Build and Installation
The hardware included in this build is:
- MSI X570 MEG ACE
- Ryzen 3900X with Wraith Prism Cooler
- 2 x 8GB TeamGroup Xtreem RGB 3600MHz DDR4 Memory
- MSI RTX 2060 Super Gaming X
- Corsair HX750i
- Crucial P1000 M.2 Drive
- 500GB TeamGroup Delta MAX
Similar to our experience with the A700, building the S500 was fairly painless and we love all the space it has. It makes installing all your hardware such a breeze. One of the features that we personally enjoyed about the S500 was the PSU bracket. It was quite nice to be able to install the PSU from the back of the case and we didn’t have to take out the S500’s PSU shroud. We also liked the SSD mount which allowed us to show off a TeamGroup Delta MAX which looks great installed in the S500.
There were a few things about the S500 that could be improved, such as cable routing options. Due to the lack of routing cutouts below the motherboard, we were forced to route them through the same grommet along with many other cables. As the grommet started to fill up, it got a lot more difficult to feed new cables through. This resulted in some cables being more visible than we would have liked. Things would have looked a little cleaner if there was an option to route through an additional grommet cutout below the motherboard.


However, cable management behind the back panel of the S500 was a breeze thanks to the included tie-downs and Velcro straps, in addition to the generous amount of space. Even though you’re not going to see any cables when the back panel is installed, we still like to see things kept nice and tidy, and this was easily achieved in the S500.

One weird issue we did run into with the S500 was that after we installed our 2060 Super graphics card, we could no longer attach both screws to the cover panel. After doing some investigating, we found the source of the issue to be the raised corners on the I/O bracket of the newer graphics cards. This causes the bracket to no longer sit flush. If it’s not sitting flush, you can’t line up each of the mounting holes to the S500. We ended up choosing to just install the top screw which held the bracket in place while still covering the cutout. This is not ideal and we hope that Thermaltake will release a new bracket and fix this in future revisions.

Final Thoughts and Conclusion

Much like building the A700, the S500 provided the space and features to archive a painless and clean build. We loved the amount of space there was to work with, and at no point did we have any difficulty installing any of the components. Even though we opted for an air-cooled build, the S500 has plenty of room for your water-cooling hardware and radiators.
One fantastic feature of the S500 (A700 as well) is its clean and modern look. The sleek lines and gorgeous black finish are sure to turn some heads. Not only does the S500 finish look great, it’s also pretty much fingerprint resistant which makes it extremely easy to maintain.
While building in the S500 was a pleasant experience, we did find a few areas for improvement. When routing our cables, we definitely missed having the option of added cutouts below the motherboard for cleaner routing and preventing cable crowding. This is a minor issue, as in the end we were still able to create a very clean build. The other issue we found was the back-covering bracket can’t be fully reattached if you install one of the newer video cards (ours being a 2060 Super). Since these newer cards have some raised corners on there I/O plate it causes the covering bracket to no longer sit flush on the case. This causes some difficulty when lining up the mounting points and will only allow for you to reattach with a single screw. This could be easily resolved with a slightly bigger bracket and we hope Thermaltake with address this issue in the future.
Overall building in the S500 was great and we ended up with an exceptional looking build. For an MSRP of $119.99, it’s one of the better-looking cases in its category and would be a worthy consideration for your next build.
Great job Thermaltake!


The 25 Best Anime Cats, Ranked
What are the best anime cats? Cats are something you either love with every fiber of your being or vehemently...


The 25 Best Anime Teachers, Ranked
Who are the best anime teachers? With high school being such a prevalent setting in anime, it makes sense that...


The 25 Best Orange Hair Anime Girls, Ranked
Who are the best orange hair anime girls? Orange hair is interesting in anime because it can either be a...